How to Make a Perfect Base in Japanese Craft Band: Preventing Warps and Wobbles in Basket Making
yassy
Crafters!

Hello everyone, Yassy here! (・∀・)
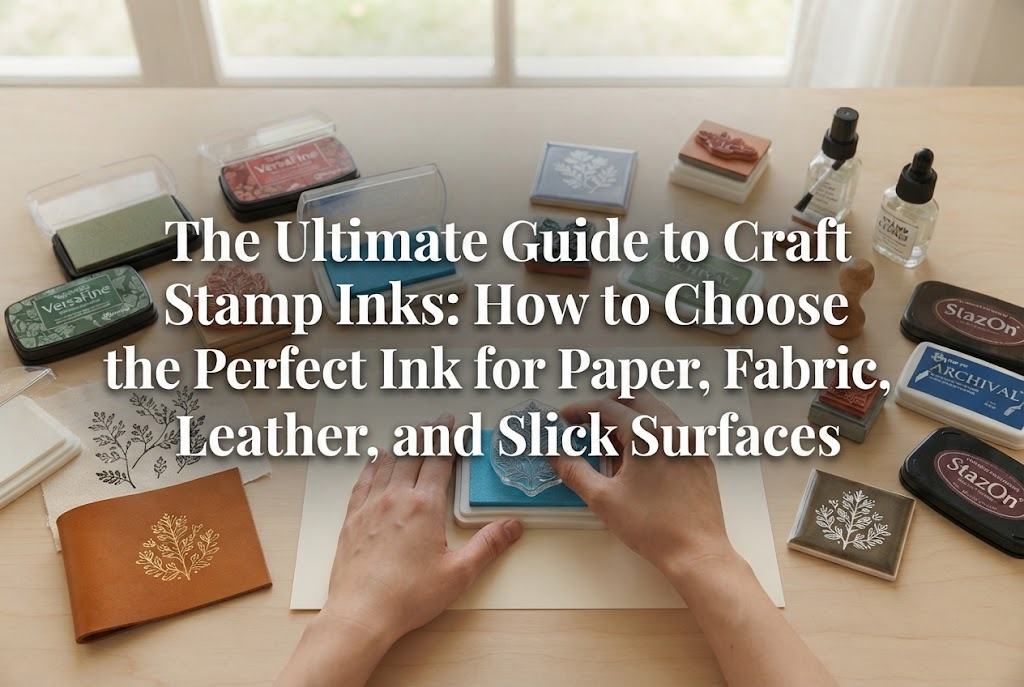
Stamps are an indispensable tool when it comes to branding and adding finishing touches to handmade creations. From shop cards and product tags to fabric drawstring pouches and subtle accents on leather goods, I use stamps in almost all of my craft projects. Just a single stamped image can bring a cohesive look to your piece, balancing rustic handmade warmth with a polished, professional finish.
However, have you ever found yourself standing in front of your craft supplies, wondering which ink pad to grab?
All of these common mishaps happen because the stamp ink isn't suited to the material you're stamping on.
Even if ink pads look identical on the outside, their chemical makeup and drying mechanisms differ completely. Once you understand how different materials and inks interact, anyone can achieve crisp, beautiful stamped impressions without any bleeding.
In this guide, I will cover everything you need to know: from the basic types of stamp inks used in handmade crafts to material-specific selection rules, professional stamping techniques, and proper care methods. Read on, and you'll never have to guess which stamp ink to choose again!
Before choosing an ink, it is essential to understand how stamp inks are formulated and categorized. Stamp inks can be broadly classified along three main axes: solvent type, colorant type, and drying/fixing mechanism. Mastering these three axes is your first step toward flawless stamping.
The solvent is the liquid base of the ink. It dictates how easily the ink is repelled by smooth surfaces, its odor, and how easy it is to clean up.
This refers to the substance that gives the ink its color, falling into either dye or pigment categories.
This explains how the ink secures itself to the target material.
Now let's look at the absolute rules for choosing stamp inks based on the actual materials you use in your craft projects. Selecting the right match completely eliminates problems like smudging, faint impressions, or washing out.
Paper is the easiest material to stamp on, but ink behavior varies depending on the paper texture and surface coating.
Best Choice: Water-Based Pigment Ink OR Oil-Based Pigment Ink
For standard copy paper, cardstock for shop cards, or kraft paper, water-based pigment ink is your best option. Because pigment particles remain on the surface, delicate fine lines and small text print sharply without feathering. If you're stamping on highly absorbent paper like Japanese washi or watercolor paper, water-based dye inks will bleed outward. Always select a pigment-based ink for these porous surfaces. For glossy coated paper or photo paper, water-based inks will bead up and fail to dry; here, oil-based pigment ink or quick-drying solvent ink is essential.
When stamping fabric items, eco-bags, clothing tags, or drawstring pouches, your main enemies are fading from laundry and ink bleeding along fabric threads.
Best Choice: Heat-Set (Fabric-Specific) Water-Based Pigment Ink
Always use a water-based pigment ink explicitly labeled for fabric. Fabric inks contain microscopic pigment particles and heat-reactive resins that lock into woven threads. The golden rule when using fabric ink is to place a pressing cloth over your stamped design and iron it with heat for at least 15 seconds after stamping. This heating step polymerizes the resin, making the design fully wash-safe. For synthetic fabrics with high polyester or nylon content, water-based fabric inks may bead up; in such cases, use a quick-drying solvent-based oil ink instead.
Stamping wood accessories, boxes, coasters, or adding logos to DIY woodworking projects is very common.
Best Choice: Oil-Based Pigment Ink OR Multi-Surface/Fabric Ink
Unfinished, natural wood and cork absorb moisture rapidly. Using a thin water-based ink will cause the liquid to bleed outward along the wood grain, distorting your stamp image. Use an oil-based pigment ink or a thicker multi-surface ink formulated for both fabric and wood. Note that if the wood has been coated with varnish, lacquers, or paint, its surface acts as a non-porous layer; treat painted wood like a non-porous surface and use quick-drying solvent ink.
Adding stamped logos or motifs to leathercraft projects elevates their handcrafted elegance instantly.
Best Choice: Genuine Leather (Vegetable-Tanned) = Oil-Based Pigment Ink / Synthetic Leather (PVC/PU) = Quick-Drying Solvent Ink
Genuine leather—especially vegetable-tanned leather—absorbs oil and moisture in moderate amounts. Oil-based pigment ink or multi-surface oil inks bond beautifully with vegetable-tanned leather. The absolute rule for genuine leather is to stamp before applying edge burnishers, topcoats, or leather waxes, as finishing coats will block ink absorption. For synthetic leathers or vinyl, which have sealed resin surfaces, quick-drying solvent-based oil inks are required.
This applies when stamping on shrink plastic, acrylic charms, glass bottles, metal tags, or resin art surfaces.
Best Choice: Quick-Drying Solvent-Based (Alcohol-Based) Oil Ink
Surfaces that are slick and completely non-absorbent are called non-porous. Standard water-based or basic oil-based inks will bead up into droplets or rub right off upon touch. Quick-drying solvent inks are the only option here. They cure within seconds and adhere firmly to smooth materials. If you make a mistake on glass, acrylic, or metal, you can wipe it away cleanly before it fully sets using rub alcohol or a dedicated solvent cleaner without damaging the underlying piece.
Even with the right ink, achieving a pristine impression requires proper technique. Here are five common reasons stamps fail and how to solve them.
Pushing a stamp forcefully down into an ink pad forces liquid into the fine grooves between lines, resulting in a dark, gloppy blob when pressed to paper.
Fix: Hold your stamp in your hand face-up, and gently tap the ink pad onto the rubber surface with light, rhythmic motions. Make sure ink only sits on the raised design elements, not in the recessed grooves.
Accidentally touching a newly stamped image and having it smear across your work usually happens when using slow-drying water-based pigment inks on low-absorbency paper (like tracing paper, sticker sheets, or heavy smooth cardstock).
Fix: Switch to a fast-drying oil-based dye ink or quick-drying solvent ink for semi-smooth papers. If you must use water-based pigment ink, use a craft heat tool or hairdryer on warm settings to force-dry the impression immediately after stamping.
If only the center of your stamp impression comes out crisp while the outer edges are faded (or vice versa), your work surface lacks proper support.
Fix: Place a dedicated rubber stamping mat or a self-healing cutting mat under your paper or material. This slight, firm resilience distributes pressure evenly across the entire stamp surface.
Using fabric-labeled ink but watching the image wash out in the laundry happens when the crucial heat-setting step is omitted.
Fix: Allow the stamped fabric to dry completely, then place a pressing cloth over the design and press down firmly with a dry iron (medium setting, around 150°C–160°C / 300°F–320°F) for at least 15 seconds. Heat polymerization creates permanent water resistance.
Picking up a fresh, bright ink pad (like pink or yellow) and getting a muddy result means old black or navy ink was left inside the fine detail grooves from a previous session.
Fix: Clean your stamps immediately after every session. For water-based inks, wipe the stamp with a damp, tightly wrung cloth or baby wipe. For oil or solvent inks, apply a dedicated stamp cleaner onto the image face, let it loosen the pigments, and wipe clean with a tissue.
The material of the stamp itself affects how ink applies and wears over time.
Rather than pressing the stamp into the ink pad, always bring the pad to the stamp. Tap softly across the image surface several times until a thin, uniform film of ink coats the raised design, catching the light with a subtle sheen.
To create tactile, raised lettering reminiscent of high-end stationery, try heat embossing. Stamp your image using a slow-drying embossing ink or slow-drying water-based pigment ink. Sprinkle embossing powder over the wet impression, tap away excess powder, and heat it with an embossing heat tool (around 250°C / 480°F). As the resin powder melts and cools, it forms a glossy, raised finish that adds immediate elegance to paper crafts.
To clean stubborn water-based ink out of intricate line work, brush gently with a soft toothbrush dipped in a little water. For solvent or oil inks, always use a dedicated stamp cleaner. Store ink pads horizontally with their lids tightly secured, face up, in a cool area away from direct sunlight so the ink remains evenly distributed in the pad.
Here is how I choose and apply specific inks in my daily crafting workflow:
When stamping logos onto kraft paper bags or textured business cards, I choose a black water-based pigment ink. The intense black pigment creates a sharp, professional contrast against the organic paper texture, and it won't smudge when clients handle the paper.
For fabric goods, I reach for heat-set water-based pigment inks in muted tones like navy, burgundy, or warm brown. Muted shades blend smoothly into natural cotton and linen fibers. After stamping, I heat-set the design with a dry iron for 15 seconds to ensure it stays permanent through routine laundering.
When adding monogram stamps or small icons to raw leather keychains, I use a brown or black oil-based pigment ink. Stamping on raw, untreated leather allows the ink to set deeply into the hide fibers, aging beautifully alongside the natural patina of the leather over time.
When adding text or line art to baked shrink plastic or clear acrylic sheets, I use a quick-drying solvent-based oil ink in black or crisp white. After letting the ink cure for one minute, I coat the piece with UV resin for a durable, dimensional, crystal-clear finish.
Choosing stamp inks may seem complex at first, but matching the solvent and pigment properties to your target surface makes selection straightforward.
Keep these summary rules in mind:
A well-placed stamp not only decorates a item, but it also gives your handmade brand a unified, high-quality identity. Grab the right ink for your next project and stamp with confidence!
If you found this guide helpful, please share it with your fellow crafter friends on social media! See you in the next tutorial—this was Yassy!




For example, if you are looking for articles about mizuhiki, try searching for "mizuhiki"; if you are interested in tools, try keywords like "nippers" or "pliers."
