Beginner’s Complete Guide to Knitting: A Zero-Fail Roadmap with Japanese Tools and Starter Kits
yassy
Crafters!

Hello, Crafters! It's Yassy! (・∀・)
As someone who absolutely loves making, viewing, and shopping for handmade goods, the craft I am currently most passionate about recommending is tie-dye! With vivid colors blending intricately to reveal one-of-a-kind patterns, tie-dye often seems intimidating at first glance. Many people think, "Doesn't it require specialized equipment and difficult techniques?" or "Won't a beginner end up washing out all the color and ruining it?" However, that assumption is entirely wrong.
As long as you follow the correct steps and prepare proper supplies, tie-dye is one of the most reliable and foolproof crafts around, allowing even complete beginners to create professional-looking work from day one. The joy of stepping outside wearing a T-shirt or carrying a bag you dyed yourself is deeply addictive! I have dyed countless shirts and small goods myself, and the thrill of snipping off those rubber bands gives me goosebumps every single time.
This article provides an exhaustive guide for anyone ready to dive into tie-dye: where to start, what tools to assemble, and the essential techniques and steps to ensure zero mistakes. There is no need to hesitate. Once you finish reading, you can grab a starter kit online and leap straight into the wonderful world of tie-dye!
Tie-dye literally means to tie cloth and dye it. By binding or folding fabric tightly, you create sections where the dye penetrates and areas where it cannot, producing distinctive and intricate patterns. While resist-dyeing traditions have existed across the globe since ancient times, modern handmade tie-dye stands out for its bold, pop colors and high-fashion appeal.
The most common fear among beginners is: "Won't all the color wash out after the first laundry cycle?" In short, if you use the proper dye and fixing agent, the colors will not fade even after repeated washes, holding up just like store-bought clothing. The key lies in selecting the right type of dye.
Dyes mainly fall into two categories: direct dyes and fiber reactive dyes. If you want to enjoy authentic, long-lasting tie-dye, you must choose fiber reactive dyes (such as cold water reactive dyes). While direct dyes can be applied simply with hot water, they bleed quickly during washing and their colors tend to look dull. Fiber reactive dyes, on the other hand, bond chemically and permanently with plant fibers like cotton. As a result, the colors stay overwhelmingly vivid and boast outstanding washfastness.
There is also an absolute rule when choosing fabric: always use 100% cotton. Fiber reactive dyes bond strongly with cellulose fibers like cotton, linen, and rayon, but they do not react at all with synthetics like polyester or nylon. Dyeing polyester blends will lead to washed-out, unnaturally patchy results. For beginners, preparing a plain white 100% cotton item is the only way to go.
When starting tie-dye, the biggest mistake is trying to source every chemical and tool individually. Dye powders, fixing agents (soda ash / sodium carbonate), professional detergent (synthrapol/soaping agents), squeeze applicator bottles, protective gloves, and rubber bands—the list of supplies is extensive.
If a beginner buys each item separately, calculating mixing ratios can be confusing and costs quickly add up, often leading to frustration before you even begin. That is why I firmly recommend purchasing a complete tie-dye starter kit from online retailers like Amazon. It is the smartest, fastest, and most foolproof shortcut.
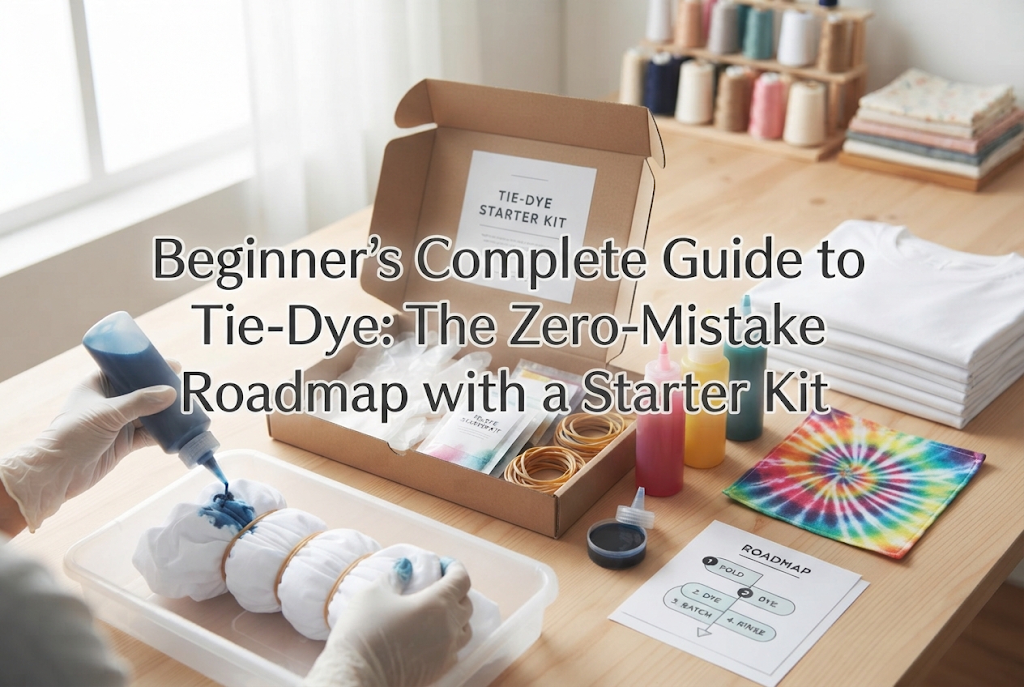
Modern starter kits are exceptionally well designed. Powdered dye is pre-measured inside applicator bottles, meaning you only need to add water and shake to get the ideal dye concentration. Many kits even include built-in fixatives, rubber bands, disposable gloves, and plastic drop cloths all in one package. You can start crafting in your kitchen or bathroom the day the package arrives at your doorstep.
While a starter kit provides the core dyeing materials, gathering a few household items or cheap finds from a 100-yen/dollar store will make your workspace clean, safe, and vastly more efficient:
The true charm of tie-dye lies in how a simple fold transforms into an intricate design. Here are three staple binding techniques every beginner should try. Each is straightforward yet yields stunningly professional results.
The iconic tie-dye design featuring dynamic swirls radiating outward from the center.
To make it, lay your damp, wrung-out T-shirt flat on a table. Pinch the fabric at your desired center point (such as the chest) with your fingers or a fork, and twist smoothly in a clockwise or counterclockwise direction. Once the fabric coils into a flat disc, carefully secure it with 4 to 6 rubber bands placed radially, cutting across the center like slices of a pie. Applying different color dyes to each wedge-shaped section produces a vivid swirl. The tighter the rubber bands, the sharper the white contrast lines will be.
Ideal for creating crisp horizontal or vertical stripes and smooth gradients.
Starting from the bottom hem toward the collar, fold the shirt back and forth in even pleats about 3 to 5 cm (1 to 2 inches) wide, similar to making an accordion or paper fan. Once folded into a single long strip, secure it tightly with rubber bands placed every few inches. Applying different colors between the banded sections yields clean stripes, giving the garment a refined look that fits naturally into everyday fashion.
This technique has no strict rules for folding or tying, making it the easiest, most stress-free method.
Simply lay the shirt flat and scrunch the fabric randomly toward the center with your hands until it forms a loose, rounded mound. Then, wrap several rubber bands around it in various directions to hold the scrunched shape together. Squirt multiple dye colors randomly over the surface to create an organic, cloud-like marble pattern. Because there is no rigid design to follow, it is virtually impossible to fail, making it the perfect choice for a first attempt.
Follow these seven specific steps in order, and you will achieve a vibrant, successful dye job every time.
Brand new shirts carry sizing agents, starches, and invisible oils from manufacturing. If left on the fabric, these will repel dye and cause patchy coloring. Wash the garment beforehand using a neutral detergent. Never use fabric softener, as its coating agents will prevent the dye from penetrating the fibers.
Do not dry the shirt after washing; simply wring out excess water thoroughly. Damp fabric absorbs liquid dye much more evenly and is significantly easier to fold. Choose your preferred fold—spiral, accordion, or crumple—and bind it tightly with rubber bands.
Fill the starter kit bottles with lukewarm water (around 40°C to 50°C / 104°F to 122°F). Lukewarm water dissolves dye powder much better than cold water, preventing clumps. Fasten the cap tightly and shake vigorously for over a minute. Undissolved powder can leave speckles or blotches on the fabric, so thorough mixing is crucial.
Place your wire rack inside the plastic tray and set your bound T-shirt on top. Bring the bottle nozzle close to the fabric and gently squeeze to let the dye soak in.
The golden rule here is to avoid placing complementary (opposite) colors right next to each other. For instance, blending red and green, purple and yellow, or orange and blue will result in muddy, dull browns or grays along the seams. Instead, arrange colors following the rainbow color wheel (red > orange > yellow > green > blue > purple). This alone will make your colors pop beautifully. Make sure to press the nozzle slightly into the folds so the dye reaches deep inside, then flip the piece over and dye the back side as well.
Do not rinse the fabric right away. Fiber reactive dyes require time and warmth to form a permanent bond with cotton fibers.
Wrap the dyed shirt securely in plastic wrap or seal it inside a ziplock bag to prevent it from drying out. Leave it at room temperature (ideally above 20°C / 68°F) for at least 12 hours, preferably a full 24 hours. In colder weather, placing it in a warm room helps maximize color payoff.
After 24 hours have passed, it is time for the big reveal! Put on rubber gloves and rinse the shirt under cold running tap water while keeping the rubber bands intact. Continue rinsing until the runoff water starts running clearer.
Next, snip the rubber bands and unfold the fabric to reveal your pattern. Continue rinsing thoroughly under water. Finally, wash the fabric by hand in hot water (at least 40°C / 104°F) with a mild detergent or the soaping agent provided in your kit. This soaping process strips away unbonded surface dye, preventing any future color bleeding in the wash.
After a final thorough rinse, run the shirt through a brief spin cycle in your washing machine (1 to 3 minutes) to extract water. Hang it on a wire hanger in a well-ventilated, shaded spot out of direct sunlight, as UV rays can cause fading while wet. Once completely dry, your custom tie-dye shirt is finished!
While tie-dye is accessible, overlooking basic principles can lead to disappointing results. Here is how to sidestep the four most common pitfalls.
Cause: Too much dye was applied, causing different colors to run together excessively on the fabric like overmixed paints.
Solution: Follow the order of the color wheel so neighboring colors blend harmoniously. Leaving small patches of uncolored white fabric between sections also keeps borders crisp and prevents excessive muddying.
Cause: The resting time was too short, the dye lacked an alkaline fixing agent, or the temperature was too cold during bonding.
Solution: Strictly observe the 24-hour waiting period. Rinsing too early washes the dye away before it forms a molecular bond. Ensure the ambient temperature stays at 20°C (68°F) or above during the curing process.
Cause: The rubber bands were tied too loosely, or the fabric was completely drenched with excessive dye.
Solution: Wrap rubber bands as tightly as possible. Strong compression blocks dye from entering, leaving clean white lines. Apply dye gradually, letting the fabric absorb each splash rather than flooding it.
Cause: Inadequate post-dye soaping with warm water and detergent left unbonded loose dye on the fibers.
Solution: Wash the dyed piece separately for its first 2 to 3 laundry cycles. If you thoroughly scrub and rinse it in warm water with detergent during Step 6 until the water is completely clear, color transfer will not occur.
Starter kits often contain more dye than needed for a single shirt. Tie-dye works wonderfully on a wide variety of 100% cotton goods. Here are great alternatives to try:
Tie-dye requires no drawing talent or delicate hand skills—it is an open, joyful craft where anyone can create wearable art. Fold the fabric, apply the dye, and wait 24 hours. The magic pattern waiting for you when you snip the rubber bands will exceed your expectations.
There is no need to overthink it. Grab an affordable starter kit online, pick out a plain cotton shirt, and turn your room into a private dye studio today!
If you enjoyed this guide, sharing it with your creative friends on social media means the world to me. See you in the next post—this was Yassy from Crafters!



For example, if you are looking for articles about mizuhiki, try searching for "mizuhiki"; if you are interested in tools, try keywords like "nippers" or "pliers."
