Beginner’s Guide to Parts Deco: Essential Tools and How to Start Fast with Kits
yassy
Crafters!
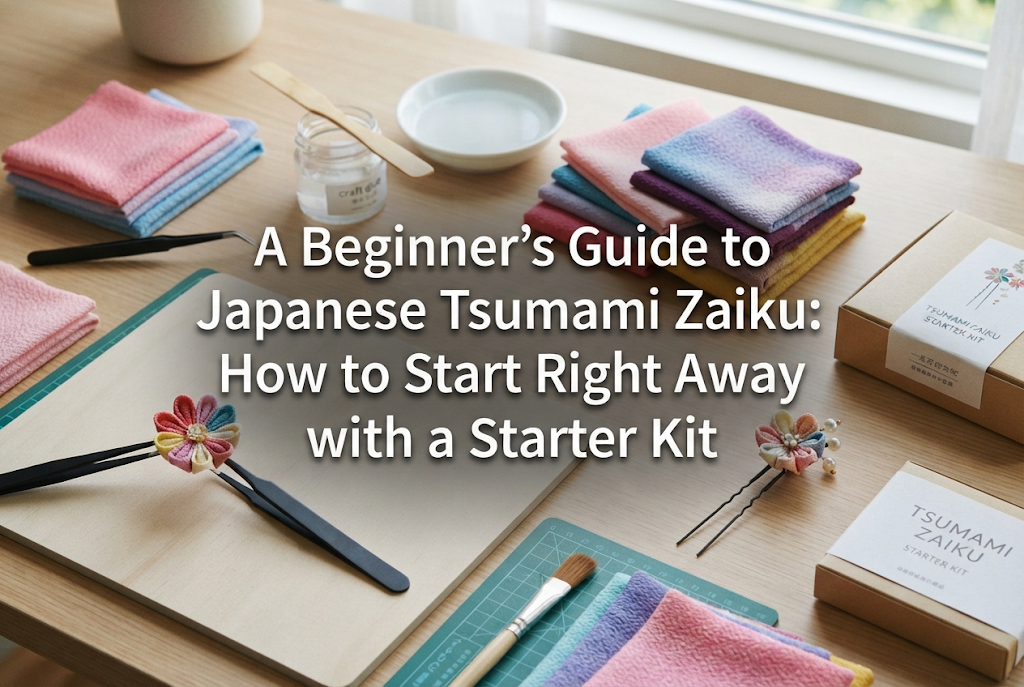

Hello, everyone! It’s Yassy from Crafters! (・∀・)
Whether it’s making handmade crafts, browsing lovely creations in craft shops, or buying unique accessories from my favorite artisans, I absolutely love the handmade world. Today, the craft I want to passionately introduce to you is Tsumami Zaiku!
When you hear "Tsumami Zaiku," you might think, "It's a traditional Japanese craft, so it must be difficult," or "Can you only wear those accessories on special days when wearing a kimono?"
Please toss those misconceptions out the window right now!
Tsumami Zaiku doesn't use needles or thread at all. It is a traditional Japanese fabric craft where small square pieces of fabric are folded using tweezers and glued onto a base to form stunning flowers. Because of this simple process, it is actually one of the most beginner-friendly genres in the handmade world.
You can freely create everything from casual, everyday hair accessories and brooches to cute earrings. Every time I see exquisite Tsumami Zaiku pieces at handmade craft fairs or online marketplaces, I am captivated by their delicate beauty. And no matter how many times I try it myself—selecting fabric, moving tweezers, and watching loose parts transform into lovely blossoms—that thrilling moment never gets old!
In this guide, I will share all the essential knowledge you need to jump into Tsumami Zaiku smoothly and complete a beautiful piece without getting lost. By the time you finish reading, you'll definitely want to grab a starter kit from online shops like Amazon and start crafting right away!
Let's start with the basics of Tsumami Zaiku and clear up why it is so highly recommended for craft beginners.
Tsumami Zaiku is a traditional Japanese technique originating from the Edo period (1603–1867). Small cut squares of fabric are pinched ("tsumamu") with tweezers, folded into petal shapes, and glued to a base disk.
There is zero sewing involved. Because the process consists entirely of folding and gluing, even those who feel they are not good at sewing can start without any worries.
Here are three common misconceptions beginners often have—and why they are completely false:
The greatest charm of Tsumami Zaiku is being able to condense your favorite aesthetic into a tiny space. Depending on color combinations, you can make your flower look sweet and cute, or chic and sophisticated. Wearing a Tsumami Zaiku hairpin you crafted yourself, or gifting one to a friend, is a wonderfully rewarding experience!
While there are various folding techniques in Tsumami Zaiku, you only need to master two core basics: Maru-tsumami (Round Fold) and Keni-tsumami (Pointed Fold).
Over 90% of Tsumami Zaiku creations in the world are built from these two basic folds or their variations. Master these two, and you can create almost any flower!
Maru-tsumami creates petals with soft, rounded tips. It is essential when you want to express a gentle, cute vibe, such as plum blossoms, cherry blossoms, round chrysanthemums, or camellias. Combining several round petals naturally forms a sweet, compact bouquet look. This is definitely the first fold beginners should try because the overlapping fabric looks soft and forgiving if your alignment is slightly off.
Keni-tsumami ("Keni" meaning sword) creates petals with sharp, pointed tips resembling a blade. This technique is indispensable for elegant, dramatic flowers like dahlias, sunflowers, or sharp chrysanthemums. The orderly alignment of pointed petals gives off an impressive, polished presence. The folding step is just as simple as Maru-tsumami, but paying attention to aligning the tips neatly instantly gives your work a professional finish.
When adhering fabric in Tsumami Zaiku, two main methods exist: Glue Tsumami (using liquid craft glue) and Nori Tsumami (using traditional starch paste).
To jump straight to the conclusion: Beginners should definitely choose Craft Glue! Here is a comparison explaining why.
Glue Tsumami uses standard quick-drying wood or craft glue (PVA glue).
For beginners who want to enjoy crafting during busy daily routines, the simplicity of glue is your greatest advantage.
In contrast, Nori Tsumami spreads starch paste over a wooden board, pressing folded petals onto the paste board to let them absorb moisture before assembly. While this allows long adjustment time to fine-tune positions, it poses several hurdles for beginners:
Starting with starch paste can lead to frustration due to complex prep work. Please start with craft glue for sturdy, manageable, and quick results!
Let's go over the fundamental items required for Tsumami Zaiku. Skimping on tool quality can cause unnecessary stress and lower the finish quality, so using the right gear from the start makes a huge difference.
Common fabrics used include Chirimen (Japanese textured crepe fabric), cotton, and real silk (Shoken). For beginners, Hitokoshi Chirimen (fine-grain rayon crepe) is the ultimate answer. It has tiny surface crinkles (shibo), making it supple and extremely easy to fold. Because it is thin, force transfers easily through tweezers, allowing you to fold small petals neatly. Cotton works fine for casual items, but thick fabrics become bulky when folded. Silk offers a luxurious look, but it is pricey and water-sensitive—save it for when you gain more experience.
Tweezers act as your extended fingers in Tsumami Zaiku. A strong warning here: avoid using general household or first-aid tweezers from 100-yen shops! If the tips do not align perfectly or lack gripping power, fabric squares will slip out continuously, ruining your focus. Choose craft or precision fine-tip tweezers where the ends align seamlessly. Straight fine-tip or curved precision tweezers (often called crane-neck in Japan) are recommended.
Select a quick-drying wood or fabric PVA craft glue that dries clear. A piece of a clear plastic file folder works as a perfect reusable or disposable glue board. Instead of applying glue directly from the nozzle, dab a small drop from the board onto your fabric using the tip of a bamboo skewer or toothpick. This is the golden secret to clean craftsmanship!
Use sharp fabric shears. Dull scissors fray fabric edges, making petal ends look messy.
You need a base to mount petals. Cut small circle discs out of sturdy cardstock and wrap them with a small piece of fabric. Assemble your flower onto this base, then glue hairpins or brooch backings underneath to complete your accessory.
This happens when excessive glue hardens and leaves noticeable white residue on the fabric surface. The cause is simply applying too much glue. Because Hitokoshi Chirimen is lightweight, a tiny dot applied with the tip of a bamboo skewer holds firmly. "A little goes a long way" is the key rule here.
When fabric squares are not cut into precise squares, folded petal tips shift, leading to mismatched petal sizes. Cutting uniform tiny squares from large fabric sheets by hand is surprisingly tricky for beginners. To avoid this completely, use pre-cut Chirimen fabric squares available in craft kits or online craft suppliers!
If you glue petals randomly around the base disc, you might run out of space for the last petal or end up with wide gaps. The fix: draw a cross (+) guide line directly onto the cardstock base disc using a pen. Glue the first 4 petals aligned with the four directions (North, South, East, West), then place remaining petals evenly in the gaps. This simple step guarantees a balanced, round blossom every time!
Gathering fabrics, specialized tweezers, and findings individually can feel overwhelming. Ordering a highly-rated starter kit on online stores like Amazon or Etsy is the most practical way to launch your new hobby.
Once you finish your starter kit, a world of possibilities opens up! You can expand into everyday jewelry like dangling earrings, pony hooks, and bag charms using modern muted color tones. As your skill grows, you can challenge yourself to make elaborate traditional hair ornaments for special occasions like weddings or festivals. Many crafters even go on to sell their handmade creations on craft platforms like Etsy, minne, or local artisan markets!
Tsumami Zaiku requires no sewing machines, large workspaces, or complex tools. It is a relaxing, rewarding Japanese fabric craft that anyone can enjoy. Search for a Tsumami Zaiku Starter Kit on your favorite online store today, pick a design you love, and experience the joy of turning fabric squares into blooming flowers with your own hands!
If you enjoyed this article, please share it with your craft-loving friends! See you in the next post—this was Yassy from Crafters!


For example, if you are looking for articles about mizuhiki, try searching for "mizuhiki"; if you are interested in tools, try keywords like "nippers" or "pliers."
