Types of Japanese Needle Felting Wool: A Complete Material Guide to Elevate Your Craft
yassy
Crafters!

Hello everyone, it's Yassy from Crafters! (・∀・)
When starting needle felting, have you ever run into frustrating issues like, "No matter how much I stab, the wool won't firm up," or "The surface is covered in visible needle holes and looks lumpy"?
Here is a reassuring secret: those struggles are rarely caused by a lack of crafting skill. More often than not, the culprit is simply the cross-sectional shape of the felting needle you are using!
At a glance, needle felting tools all look like identical metal pins. However, their blade geometries feature distinct engineering differences. Once you understand how these designs work and switch between them at the right moments, your crafting speed will skyrocket and your surface finishes will become remarkably smooth and refined.
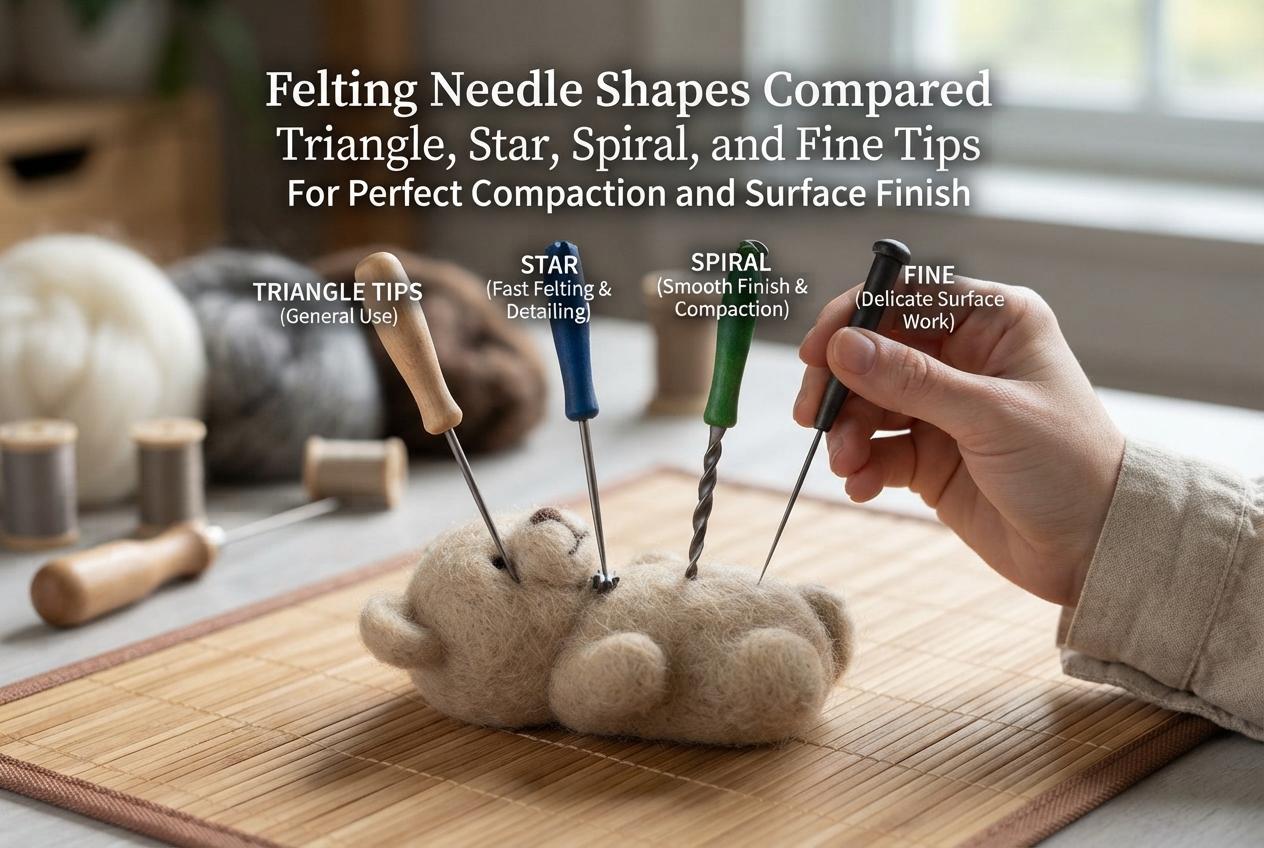
In this guide, we will dive deep into four primary needle tip shapes—Regular (Triangle), Star (Cross), Spiral (Twisted), and Fine—comparing their felting efficiency, surface finish quality, and ideal use cases. I will also share common beginner pitfalls to avoid and my personal workflow for needle selection, so stay tuned!
Before jumping into specific shapes, let's review the physical mechanism behind how repeated needle pokes turn loose wool fibers into solid felt. Understanding this process makes choosing the right tool much more intuitive.
Under a microscope, wool fibers have microscopic scales along their surface. A felting needle features tiny directional notches or projections called "barbs" cut into its edges.
When you push the needle into a bundle of wool, these barbs catch the fiber strands and push them downward into the core.
When you pull the needle back out, the barbs release the fibers, leaving them anchored deep inside. Repeating this motion hundreds or thousands of times causes the fiber scales to lock onto one another, progressively tightening and solidifying the wool.
Ultimately, both compactive speed and surface neatness come down to a single principle: how many fibers the barbs catch per stroke, and how they pull those fibers inward.
A frequent point of confusion among beginners is mixing up needle "gauge" (thickness) with "tip shape" (cross-sectional geometry).
Needle gauge simply refers to the shaft's diameter—heavy needles have low gauge numbers, while fine needles have high gauge numbers. On the other hand, the tip shape describes the profile of the working blade itself: triangular, four-sided star, or twisted.
Even at the exact same gauge, two needles with different cross-sections will feel completely different to push, compact wool at different speeds, and leave different marks on the surface. True mastery of needle selection lies in pairing the right gauge with the right shape.
Let's examine the four main needle profiles, breaking down their structural characteristics, compaction power, and surface results.
This is the standard triangular needle included in nearly every beginner kit on the market.
With barbs evenly spaced across three edges, the regular triangle needle is a well-balanced, jack-of-all-trades tool. It can handle basic shaping from the early wrap stages through general sculpting.
However, because it is an all-rounder, it is not specialized for peak performance. Firming up a dense core takes considerable time, and pushing it deep during later stages leaves distinct triangular indentations. While fine for general-purpose shaping, stepping up to other needle profiles is essential if you want to speed up production and elevate your work's finish.
When you need to construct a sturdy core or compact larger sculptures quickly, the star needle is unmatched in power.
With four working edges instead of three, the star needle carries an additional row of barbs. This allows it to grab significantly more wool fiber with every single plunge.
In practice, the difference is night and day: wool draws inward rapidly, forming a solid base in a fraction of the time. Tasks that take 100 pokes with a triangle needle can often be accomplished in roughly half the strokes using a star needle.
The tradeoff is higher resistance when pushing into firm wool, as well as relatively large puncture holes. It is strictly a workhorse needle meant for base building and internal densification—never for pristine top-layer finishing.
For crafters looking to elevate their technique beyond the basics, the spiral needle is my top recommendation.
The standout feature of a spiral needle is how its helical twist grabs wool strands in three dimensions, tangling fibers firmly with every poke. This provides greater fiber retention than straight-edged blades, resulting in excellent felting speed.
Even better is how cleanly it finishes! Because the blade twists as it penetrates, withdrawing the needle gently pulls neighboring fibers together, naturally collapsing the entry hole. It essentially compacts and conceals holes simultaneously.
This makes the spiral needle exceptional for attaching fine patterns, drawing line details, and blending seam lines between joined parts seamlessly.
A fine needle is the ultimate tool for perfecting texture and hand-feel. While "fine" refers primarily to an ultra-thin gauge with shallow barbs, fine needles can feature regular or spiral profiles.
Fine needles work purely on the shallowest layer of surface fibers without disturbing the dense wool packed beneath.
Trying to build a base with a fine needle would take forever because its grabbing power is minimal. However, during the final moments of a project, lightly grazing the surface with a fine needle will buff out lingering puncture marks and tuck loose stray hairs neatly inside, delivering a smooth, professional sheen.
As this chart illustrates, each shape has a distinct role. Relying on a single needle from start to finish is naturally going to cause issues.
Many crafters who get discouraged think their hands are clumsy, when in reality they are just using the wrong needle for the task. Check if you have fallen into any of these three traps:
This is by far the most widespread mistake. Starter kits almost always provide one medium regular triangle needle.
Using this single needle to form a firm core takes endless stabbing and tires out your wrist. Worse, continuing with that same needle all the way through finishing leaves deep, conspicuous triangular pits everywhere, giving the piece an uneven, pockmarked look. Once you reach surface detailing, switching needles is essential.
Beginners often reach for a fine needle right away, hoping to prevent visible holes from the start.
Because fine needles have shallow barbs, they cannot pull deep fibers inward. You can poke thousands of times, but the interior remains loose and squishy while only the outer skin firms up, resulting in a hollow piece that loses its shape over time. For initial base building, always use a star needle or medium-to-coarse triangle needle.
When a sculpture is already somewhat firm, attempting to force it even harder by driving a heavy triangle or star needle straight into the core is a recipe for disaster.
Dense fiber creates severe resistance. Forcing a thick needle deep inside can bend the tip or cause it to snap with a sharp pop, trapping broken metal inside your project. As density builds, transition to finer needles or spirals.
Here is my exact sequence for switching needles during a project. Adopting this routine can cut your production time nearly in half while dramatically improving the neatness of your finished pieces.
When making core shapes—such as a dense sphere or a torso base—reach exclusively for the star needle.
Roll your core wool tightly by hand, then stab briskly with the star needle all the way into the center. Thanks to its four-sided barb profile, the core firms up rapidly into a solid foundation that does not cave in when squeezed. A firm core is your best defense against later distortion.
Once the core is firm, switch to a medium regular triangle needle to wrap surface colors and attach appendages like ears, limbs, or snouts.
If you continue using a star needle here, its aggressive pull may drag colorful top layers too far into the core, causing the white core wool to show through. The moderate grip of a regular needle lets you refine proportions cleanly and anchor joints securely.
For facial features, animal markings, indented eye sockets, or crisp separation lines, grab a spiral needle.
Slanting the spiral needle as you work locks thin strands of colored wool securely in place without drifting. Because the twist naturally closes puncture marks, detail lines stay crisp and bold without a halo of needle pits.
When the piece is fully sculpted, switch to a fine needle (or fine spiral).
The technique here is key: do not stab deeply. Instead, angle the needle shallowly and make gentle, rapid taps across the outer few millimeters of the surface. This closes remaining holes and tucks stray surface fluff beneath the skin. Finish by trimming any lingering stray fibers with scissors for a store-bought quality finish!
Felting needles are consumable tools, but good habits will keep them working smoothly and prevent premature breakage.
Over 90% of broken needles snap because the exit angle does not match the entry angle.
If you insert the needle at an angle along a curved edge and then unconsciously twist your wrist as you pull it out, the lateral pressure will snap the brittle tempered tip instantly. Always insert and pull out along the exact same straight trajectory, keeping your wrist relaxed and steady.
Most needles are made of carbon steel, which oxidizes easily when exposed to skin oils and ambient humidity. Rusted needles develop rough friction that drags against wool, making a squeaky sound and resisting clean compaction.
When you finish crafting, wipe your needles clean with a dry cloth. If you plan to store them for a while, apply a micro-thin layer of mineral or sewing machine oil. Storing them in a dedicated hard case is also wise to prevent accidents with children or pets.
To recap our comparison of the four main needle profiles:
If you have been doing everything with just the standard needle from your starter kit, try adding a star needle and a spiral needle to your toolkit. The difference in stabbing speed and surface beauty will amaze you!
Equip yourself with the right tools, and enjoy a much smoother, more rewarding needle felting journey. If you found this breakdown helpful, please share it with your fellow crafters!
Until next time, this is Yassy from Crafters signing off! Happy crafting!



For example, if you are looking for articles about mizuhiki, try searching for "mizuhiki"; if you are interested in tools, try keywords like "nippers" or "pliers."
