UV vs. UV-LED Lamps for Japanese Resin Craft: How to Choose the Perfect Curing Lamp
yassy
Crafters!

Hello, crafters! It’s Yassy from Crafters! (・∀・)
When working on paper crafts, leathercraft, or clay modeling, many makers hit the same familiar walls: fold lines don't look crisp, pattern transfers smudge, or dimensional details fall flat.
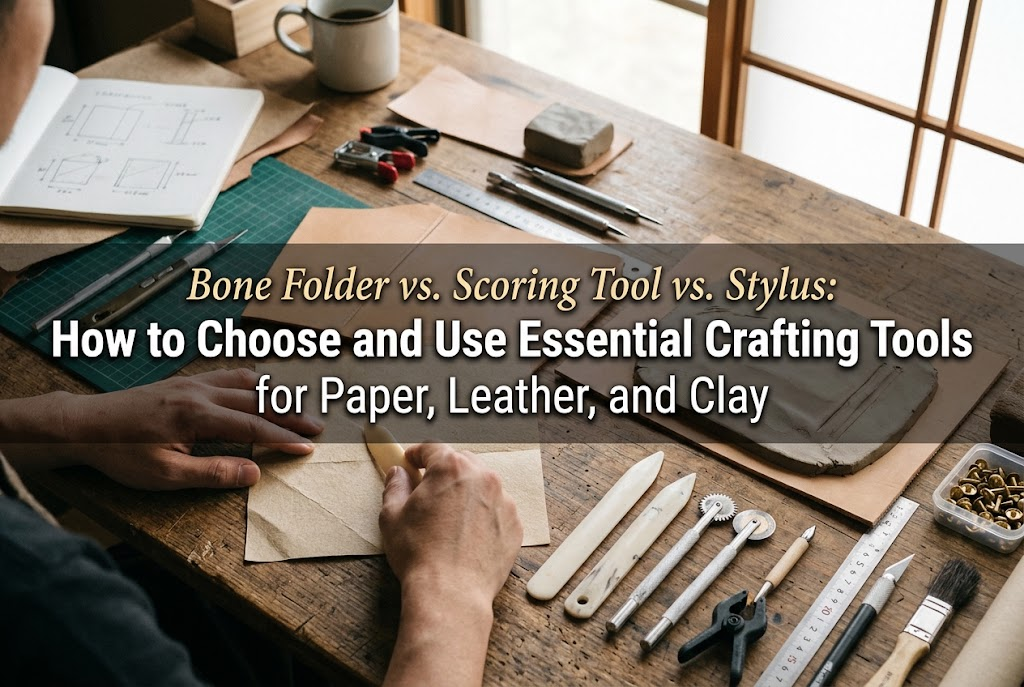
Relying only on your bare hands and fingertips often leaves finished work looking slightly unfinished. That is where three indispensable shaping implements come into play: the bone folder, the scoring tool, and the ball stylus.
While they might seem modest at first glance, these are vital items for elevating the quality of your handmade pieces to a truly professional standard. As someone who loves making, viewing, and shopping for all kinds of handmade crafts, I will thoroughly break down their roles, key differences, specific use cases, and how to choose the right one without mistakes.
To begin, let’s clarify the big picture of what each tool does. While their shapes and materials vary, they share a common purpose: providing precise friction, bending, creasing, and pressing.
Because they are often mixed up, using the wrong tool can damage your working material or fail to deliver the intended result. Understanding their core functions is the first step toward better craftwork.
Even though they might all seem to "fold or mark lines," their mechanics and optimal materials differ significantly. Let's look closer at each one.
The bone folder is a classic, powerful shaping tool traditionally treasured in bookbinding, leathercraft, and paper arts. Featuring flat sides, smooth curves, and a pointed tip, it delivers consistent pressure that fingers alone cannot match.
Folding paper or leather with bare fingers can transfer body oils or moisture, causing smudges, and uneven finger pressure often leads to wavy folds. A bone folder uses friction and even pressure to burnish both straight folds and curves flawlessly.
A bone folder excels most at setting firm creases and laminating layers together. When working with heavy cardstock or drawing paper, gliding the edge of a bone folder along the fold instantly produces a sharp, clean corner.
In papercraft and French cartonnage, rubbing a bone folder over freshly glued surfaces pushes out trapped air bubbles and creates a complete bond. In leathercraft, it is equally essential for flattening folded edges and pressing cemented leather pieces securely together.
Bone folders generally come in three distinct materials, each offering different glide, durability, and price points:
The golden rule for using a bone folder is to keep it angled low and glide it smoothly. Pressing too hard with the pointed tip upright can scrape or tear the paper surface. Instead, rest the flatter belly of the folder against the paper at an angle of roughly 30 to 45 degrees, applying balanced pressure.
When creasing, make an initial gentle fold by hand, then sweep the bone folder from one end of the fold to the other in a single fluid pass. Avoid scrubbing back and forth; moving in one continuous direction creates a straight, warp-free crease.
A scoring tool comes into action before paper is folded. Thick cardstock, specialty art papers, and packaging board will often crack unsightly along the exterior fold if bent directly.
A scoring tool indents an intended "hinge line" without tearing the internal paper fibers, allowing the sheet to fold smoothly and accurately.
Unlike a blade, a scoring tool has a blunted, slightly rounded edge made of metal or rigid plastic. It is built to compress and indent the paper fibers rather than slice through them.
A frequent beginner mistake is using the spine of an ordinary utility knife or craft blade. This should be avoided. The squared back of a utility blade is often too sharp, cutting the paper's surface layer and drastically weakening the structural integrity of the fold. That cut often leads to tearing as soon as the piece is bent. A dedicated scoring tool with a polished, rounded edge is essential for long-lasting paper projects.
Scoring tools shine when constructing greeting cards, 3D paper models, and custom gift boxes. Align a ruler and draw the scoring tip lightly across your line to create an understated, clean groove.
With this guide groove in place, even complex polyhedra or tiny origami-style papercrafts will fold precisely where intended. In cartonnage, scoring the edges of backing boards makes wrapping fabric and decorative paper around corners crisp and tight.
Always pair a scoring tool with a sturdy metal ruler. Plastic rulers can easily be gouged by the tip, which causes your line to veer off track.
Hold the tool at a 60- to 70-degree angle against the paper surface. Apply balanced pressure and make one or two deliberate passes. Scrubbing repeatedly will widen the groove and muddy the fold. A single, decisive stroke is the secret to a professional result.
A stylus typically features a dual-ended handle fitted with smooth metal spheres of different sizes. It is also known as a tracing stylus, dotting tool, embossing stylus, or modeling tool.
The spherical tips make this tool remarkably versatile across a wide spectrum of crafts: paper crafts, clay modeling, UV resin, nail art, and pattern transferring.
The defining feature of a ball stylus is its perfectly rounded tip. Because there are no sharp edges, you can apply pressure from any angle without puncturing your materials.
Most models feature dual ends with contrasting ball diameters, ranging from ultra-fine (0.8 mm) up to broader sizes (3.0 mm and above):
When transferring embroidery patterns, woodburning sketches, tole painting outlines, or felt templates, a stylus is indispensable. Simply place your design over transfer paper (such as dressmaker's carbon paper or tracing paper) and trace the lines with the stylus.
Using a pencil or ink pen can soil your original design sheet or tear through delicate paper. A metal stylus leaves the original pattern clean and intact for repeated use.
Keep your tracing pressure moderate and steady. Too little pressure leaves faint transfer lines, while too much pressure permanently indents the base material underneath. A tip around 1.5 mm provides the most consistent line weight for transferring.
A ball stylus is equally practical in three-dimensional work. When working with polymer clay or air-dry resin clay to make miniature sweets or flowers, pressing the ball tip creates natural, smooth hollows and realistic textures. Rolling the ball lightly along the edge of a clay petal will quickly ruffle and thin it out like real foliage.
In resin crafts, the fine tip helps coax out or pop trapped micro-bubbles in liquid resin. It can also be used to position tiny rhinestones and beads into tight spots with pinpoint precision.
When starting out, it is tempting to use household items as substitutes: the corner of a plastic ruler, a dried-up ballpoint pen, the back of a metal spoon, bamboo skewers, or fingernails.
However, I do not recommend makeshift tools. Dedicated tools are specifically shaped to maximize control and protect delicate craft surfaces.
Investing in inexpensive dedicated tools prevents ruined materials, accelerates your workflow, and yields visibly better results right from the start.
If you are wondering which tool to purchase first, let your primary crafting medium guide your decision.
Your primary tool should be a bone folder (Teflon or natural cattle bone). It handles creasing, shaping, and gluing burnishing in a single implement. If you frequently assemble dimensional boxes or score heavy cardstock, add a dedicated scoring tool as your second purchase.
Start with a bone folder. From pressing folded leather edges and securing bonded seams to working along edge bevels, it sees constant use in leather workshops. If you want to trace patterns onto leather or tool surface lines, add a stylus (modeling spoon/point).
If your focus is clay miniatures, UV resin accessories, or embroidery pattern transfer, begin with a dual-ended ball stylus (such as a 1.0 mm / 2.0 mm combination). It covers fine modeling, bubble popping, and tracing with ease.
Even high-grade tools can cause mishaps if mishandled or neglected. Keep these simple maintenance rules in mind to get the best performance from your tools for years to come.
The universal guideline across all these tools is: never force them with excessive pressure. Thin paper and supple leather can stretch or tear under heavy friction.
Whether you are scoring or tracing, start with a light touch. Rather than forcing a deep impression in one hard scrape, focus on guiding the tool accurately with balanced, controlled pressure adapted to your material's thickness.
After crafting, tools often collect glue residue, clay particles, or paper dust. If neglected, this buildup can transfer onto your next project.
After each session, wipe tips and edges clean using a soft, damp cloth wrung out tightly. For metal styluses, ensure they dry thoroughly to prevent rust spots.
If dried glue adheres to a bone folder, gently rub it away using a cloth moistened with lukewarm water. Never scrape bone folders with harsh abrasives or scouring pads, as fine scratches will ruin their smooth glide. Keeping their surfaces polished is key to clean work.
Here is a quick recap of the three shaping essentials:
Giving proper attention to the fundamental steps—folding, scoring, and burnishing—is what removes that uneven homemade feel and gives your pieces a refined, professional look.
Find the right companion for your favorite medium, and enjoy taking your handmade work to the next level! If this guide helped you, sharing it on social media with your fellow craft lovers is always appreciated. See you in the next article—this was Yassy from Crafters!

For example, if you are looking for articles about mizuhiki, try searching for "mizuhiki"; if you are interested in tools, try keywords like "nippers" or "pliers."
