How to Get Perfectly Even, Round Wax Seals: Mastering Level Surfaces and Vertical Placement
yassy
Crafters!

Hello, everyone! It’s Yassy from Crafters! (・∀・)
Whenever you are making bags, pouches, or garments, one material you simply cannot do without is fusible interfacing (known as sechaku-shin in Japanese sewing). Simply by fusing it to the wrong side of your fabric, it adds the perfect amount of body, prevents stretching, and helps your finished handmade projects maintain their clean, beautiful shape.
However, I frequently hear sewing beginners say things like, “My fabric wrinkled up after applying interfacing,” “It peeled off while I was sewing,” or “Adhesive melted all over my iron soleplate and made an awful sticky mess!”
In reality, most interfacing mishaps come down to just a few minor missteps in iron technique and prep work. Once you grasp the right foundational knowledge and a few key tricks, anyone can achieve a flawless, smooth, professional finish without a single wrinkle.
In this guide, I will walk you through the basics—from choosing the right type of interfacing to foolproof application steps and troubleshooting tips. Master fusible interfacing and elevate your sewing projects to the next level!
When you are new to sewing, it is easy to wonder, “Do I really need to spend extra time applying interfacing to the inside where nobody can see it?” When I first started out, I used to think, “It just makes the fabric slightly stiffer, right?” and skipped it—only to regret it later.
Interfacing plays several crucial roles that directly determine the final quality of your work.
If you craft a tote bag or pouch out of a soft, lightweight cotton print without interfacing, it tends to collapse and lose its shape as soon as you put items inside. Applying interfacing gives the base fabric crisp body and substance, allowing it to hold a neat, structured, boutique-like form.
Woven fabrics are naturally susceptible to stretching along the bias (diagonal grain) or when pulled. Areas subjected to stress—such as bag handles, zipper insertion zones, necklines, and garment facings—can stretch and warp over time. Reinforcing these parts with interfacing provides strong resistance against distortion.
Lightweight, floppy, or stretchy fabrics often cause issues on a sewing machine, such as puckering or skipped stitches. Stabilizing your fabric with interfacing beforehand gives it firmness, helping the needle pierce smoothly and resulting in clean, straight stitch lines.
The first step toward clean application is matching the right interfacing to your project and main fabric. If you pick the wrong type, no amount of careful ironing will prevent bubbling or an unnatural hand-feel.
Interfacing available in craft shops generally falls into three categories:
If you are a beginner wondering what to buy for general pouches, bags, or garments, starting with a lightweight to medium-weight woven interfacing is virtually foolproof.
The golden rule of interfacing is to choose an interfacing that is slightly lighter than, or at most equal to, the weight of your main fabric.
Fusing a thick interfacing to a lightweight fabric often causes stiff, unnatural creases and a rigid finish. On the flip side, applying paper-thin interfacing to a heavy canvas will provide almost no stabilization. Always balance the thickness of your outer fabric with your interfacing.
One of the most common traps beginners fall into is the cutting sequence. If you carefully cut your pattern pieces out of both fabric and interfacing first and then try to fuse them together, the heat of the iron will cause the interfacing to shrink slightly. The pieces will no longer match up, and exposed adhesive around the edges will end up stuck to your ironing surface.
The most reliable, clean method I always use is: Cut both your fabric and interfacing slightly larger than your pattern piece (roughly 1 cm / 0.4 in extra all around), fuse them together, let them cool completely, and then cut them out along the pattern lines together.
By doing this, you never have to worry about slight shrinkage or misalignment during pressing. The edges will align with razor-sharp precision, making subsequent sewing much easier.
Setting up your workspace properly before heating up your iron makes all the difference.
A standard household iron works fine, but the ironclad rule for fusible interfacing is to use a dry iron setting without steam.
If you introduce steam (moisture), the heat-activated adhesive gets lifted by the vapor, dramatically reducing bonding strength. Trapped moisture between the layers also creates air bubbles and wrinkles. Always turn off the steam function and make sure you press with a flat section of the soleplate.
Soft, squishy ironing boards or wire-mesh boards are not ideal for fusing. When you press down, the pressure dissipates into the padding instead of driving the adhesive into the fabric weave.
A firm, solid pressing board is best. Alternatively, you can place a solid wooden board or a dedicated tailor’s pressboard on top of your standard ironing board to provide firm support.
Pressing your iron directly against interfacing can cause any stray adhesive to stick to the iron base, leading to scorched residue. Furthermore, direct high heat on the right side of delicate fabrics can produce an unwanted shiny glaze.
Always use a pressing cloth. A thin, 100% cotton cloth (such as lawn or a clean handkerchief) works wonderfully. If you want absolute protection against stray glue, parchment paper (baking paper) or a non-stick iron pressing sheet is fantastic because adhesive will not stick to it and peels right off.
Once your workspace is ready, follow these five steps systematically.
Before introducing the interfacing, thoroughly press your outer fabric to eliminate every tiny fold and crease. If you fuse interfacing over a wrinkle, that crease gets permanently bonded into the fabric and cannot be removed. Always begin with flat, pre-ironed fabric (ideally pre-washed/grain-straightened if necessary).
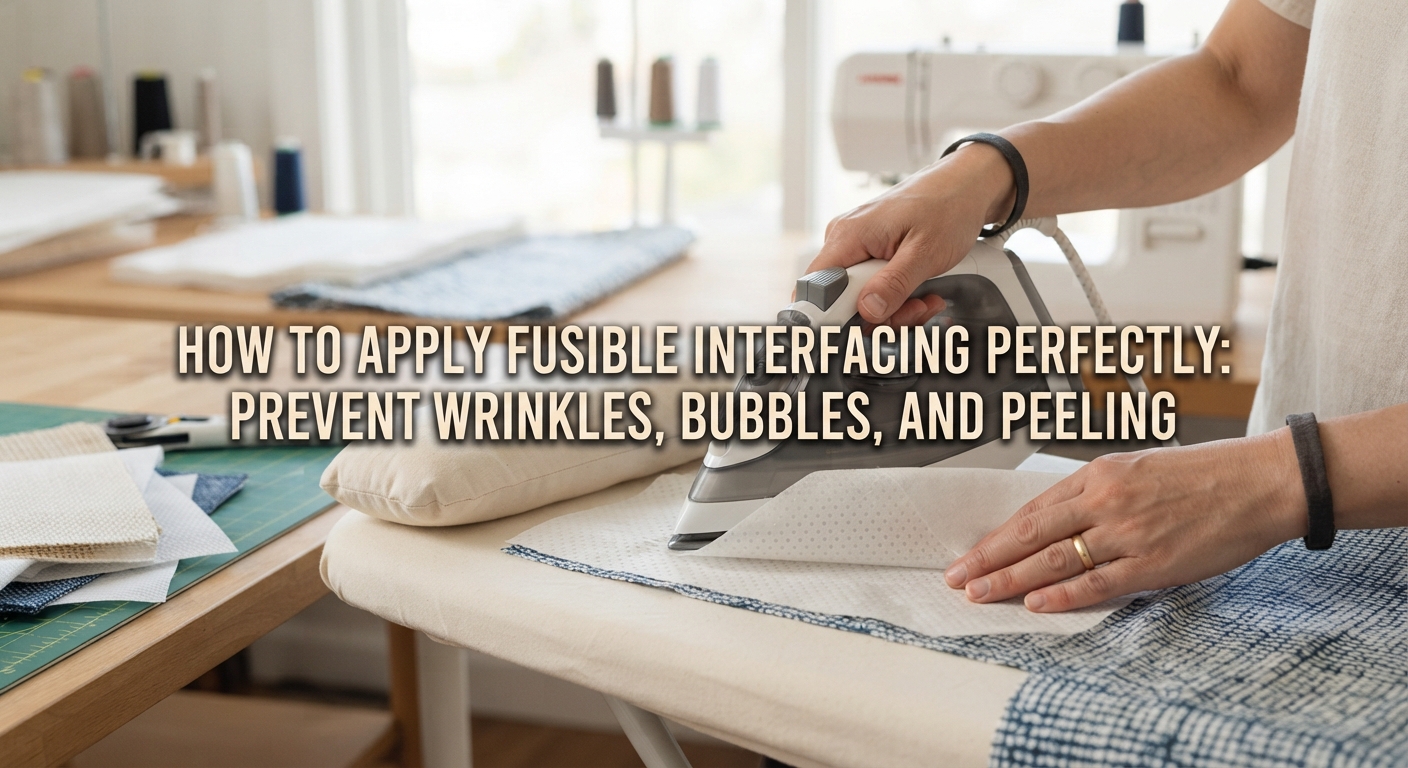
Place your main fabric wrong-side up on your pressing board. Lay the interfacing on top.
Double-check which side has the adhesive! Interfacing has a textured, slightly bumpy or shiny side (where the heat-sensitive glue dots sit) and a smooth side. Make sure the rough, glue side is facing down against the wrong side of your fabric.
If you accidentally put the glue side facing up toward the iron, you will end up with adhesive baked onto your iron plate. Get into the habit of touching the interfacing with your fingertips every time to confirm the rough side.
When using woven interfacing, align the grainline (warp and weft) of the interfacing with the grainline of your outer fabric. Mismatched grainlines can cause strange diagonal tugging and puckering later on.
Gently lay your pressing cloth over the assembled layers. Set your iron temperature according to the interfacing manufacturer’s recommendation (typically medium heat: roughly 130°C–150°C / 265°F–300°F).
Here is the critical rule: Do not slide the iron back and forth like you do when ironing clothes.
Sliding the iron pushes and drags the freshly melted glue horizontally, bunching up the interfacing and creating stubborn creases. Instead, press straight down vertically from above, using your upper body weight to apply firm downward pressure—just like pressing a rubber stamp.
Hold the iron firmly in place for 10 to 15 seconds per spot without moving it. If you press for too short a time, the glue will not fully liquefy, causing the interfacing to peel off later.
Once one section is done, lift the iron completely, shift it to the next spot with a slight overlap over the previously pressed area, and hold down again for 10 to 15 seconds. Overlapping ensures no unpressed gaps remain.
For larger pieces, work systematically from the center outward to push trapped air out toward the edges, preventing bubbles.
Once you finish pressing the entire piece, resist the urge to immediately pick it up, inspect it, or fold it.
Fusible interfacing works on a simple principle: the adhesive melts under heat, and as it cools, it hardens and locks tightly into the fabric fibers. If you handle or bend the piece while it is still warm and the glue is soft, the bond breaks easily, causing bubbling and distorted edges.
Leave the fused piece lying completely flat on your board until all residual heat has dissipated (at least 2 to 3 minutes). Giving it this brief rest makes the difference between a permanent bond and a peeling mess.
Even with careful work, unexpected issues can pop up. Here is how to diagnose and fix them.
When the front of the fabric shows ripples or air pockets after fusing—a condition known as bukutsuki in Japanese tailoring—the cause is almost always sliding the iron, using steam, or not applying enough pressure.
If bubbling is minor, you can often fix it: lay your pressing cloth over the affected spot and press firmly down with a dry iron once more. The heat will re-melt the glue, and vertical pressure will squeeze out the trapped air and re-bond the layers cleanly.
If corners or cut edges lift up, the culprit is usually insufficient heat, too short a dwell time, or inadequate pressure. The tip and edges of an iron often run cooler and receive less force than the center.
Simply raise the iron temperature slightly, cover the edge with your pressing cloth, and press firmly for a solid 15 seconds, focusing your downward weight directly over the lifted edge.
If interfacing slipped out from under the pressing cloth or was accidentally placed upside down, never continue ironing other fabrics with a dirty soleplate—you will transfer burnt glue onto your main fabric.
While the iron is still warm (exercise extreme caution to avoid burns!), wipe the soleplate firmly using a damp, tightly wrung scrap cloth or rag. Commercial iron cleaners also work wonders on stubborn spots.
Here is a quick recap of the golden rules for applying fusible interfacing:
Taking the extra care during this preparation stage will reward you with crisp lines, professional structure, and long-lasting durability in every bag, pouch, or garment you sew.
It may feel a bit deliberate at first, but with a little practice, this pressing rhythm will become second nature. Give these steps a try on your next sewing project!
If you found this guide helpful, please feel free to share it with your fellow crafting friends on social media. Happy sewing, and see you in the next post! This was Yassy from Crafters!




For example, if you are looking for articles about mizuhiki, try searching for "mizuhiki"; if you are interested in tools, try keywords like "nippers" or "pliers."
