Level Up from Starter Kits: The Golden Sequence for Upgrading Fabric Dyeing Tools
yassy
Crafters!

Hello, everyone! I’m Yassy from Crafters! (・∀・)
Have you ever made a handmade leather piece and thought, "Why does this look a bit homemade compared to store-bought genuine leather items?" or "Why do the edges look amateurish?" About 90% of the time, the culprit lies in how the leather edges—known in Japanese craft as koba—are finished.
In leathercraft, edge finishing is the most critical process that determines both the refined quality and the durability of your work. The absolute magic tool that dramatically transforms this edge finish is the subject of today’s guide: the edge beveler (called heri-otoshi in Japan).
While I create various types of handmade crafts, I can safely say that using an edge beveler is my absolute favorite step in leathercraft. The thrilling sensation of peeling away thin, smooth shavings from the sharp corner of leather is downright addictive once you experience it.
In this comprehensive guide, I’ll share my knowledge and experience as a Japanese craft writer. We’ll cover everything from the basic purpose of an edge beveler, how to choose the right blade type and size number, key differences from similar tools, and step-by-step techniques to ensure complete success for beginners. By the end of this article, all your questions will be answered, and your handmade leather goods will reach a level of polish rivaling professional items on handcraft marketplaces!
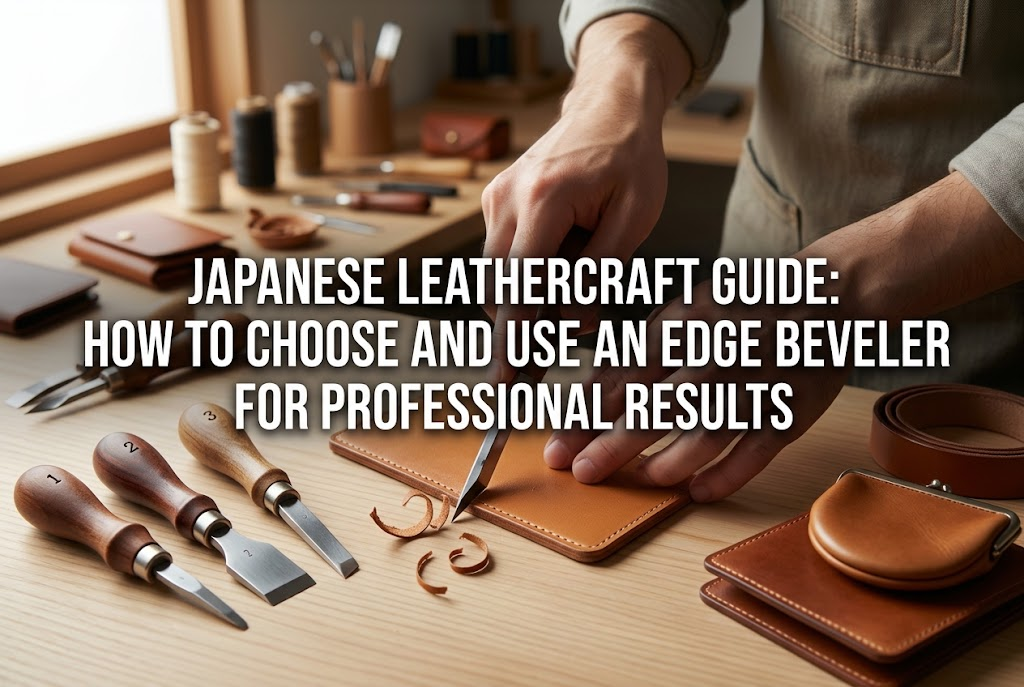
An edge beveler is a specialized leathercraft cutting tool designed to shave off the sharp right-angled corners (edges) of freshly cut leather. In Japan, it is known as a heri-otoshi (literally "edge dropper").
Right after you cut out your pattern pieces with a utility knife or a Japanese leather knife (leather knife/leather knife blade), the cross-section of the leather edge sits at a sharp 90-degree angle. Beveling is the process of taking off that sharp edge uniformly at an angle to create a smooth, rounded profile.
You might wonder why it is worth taking the extra time to trim away these corners. Removing the sharp corners of leather serves not only to make the item look beautiful, but also fulfills essential practical functions that extend the life of your creations.
If you attempt to burnish a raw 90-degree edge using finishing agents like Tokonole, the sharp corners harden as they are, leaving a stiff, rigid feel. Furthermore, the pressure applied during slicking concentrates on those sharp points, which can cause the edges to dent unevenly or deform.
By trimming the top and bottom corners with an edge beveler beforehand, the cross-section forms a neat, rounded arch. When you burnish the edge in this condition, it develops a smooth, plump, glossy sheen that instantly gives your project a sleek, professional finish.
Leather items with sharp corners endure constant friction against clothing, bag linings, or pockets during daily use. Over time, the sharp corners catch, causing the leather to peel, fray, or fuzz up, accelerating wear and tear.
Rounding the edges with a beveler drastically reduces external friction resistance. For items handled frequently—like wallets and card holders—whether or not you used an edge beveler will make a massive difference in durability years down the road.
The inviting, high-quality comfort of a leather item comes from gentle edge curves. Leather goods with unrounded edges feel harsh, digging uncomfortably into your palm or fingers when gripped.
Carefully beveling the edges creates a supple, smooth texture that fits comfortably in the hand. To craft thoughtful pieces with the user's comfort in mind, the beveling step is absolutely indispensable.
When searching for an edge beveler at leathercraft specialty stores or online shops, beginners often feel overwhelmed by the variety of blade shapes and size numbers. Let’s break down the blade styles and sizing systems clearly so you can choose your ideal tool with confidence.
Edge bevelers generally fall into three main blade categories: Grooved Type, Flat Type, and Western/French Type. Understanding their structural differences will help you select the best fit for your needs.
1. Grooved Type (Standard Japanese Style):This is the most common style found in Japanese leathercraft. The tip features a central V-shaped or U-shaped groove. You simply rest the groove against the corner of the leather and slide it along to shave off a uniform width. Because the groove acts as an easy guide, even complete beginners can achieve clean, straight cuts without wobbling.
2. Flat Type (Traditional Japanese Style):This tool features a flat blade similar to a flat woodcarving chisel. While it allows you to freely control the cutting angle and depth through your own hand pressure, maintaining a constant width requires practice and skill. It is best suited for advanced crafters and professionals who want fine control over various leather types.
3. Western / French Style (Rounded Tip):Commonly seen in high-end tools from Europe and North America, this style has a thin, gently rounded profile. It offers exceptional sharpness and requires minimal force, gliding smoothly along the leather, though it generally comes at a higher price point.
For beginners, the Grooved Type (Standard Japanese Style) is undeniably the best choice. The front groove serves as a built-in guide, allowing you to achieve clean, straight cut lines without needing advanced techniques.
Edge bevelers use size numbers such as No. 0, No. 1, No. 2, and No. 3. These numbers indicate the cutting width (blade width): smaller numbers cut finer strips, while larger numbers shave wider pieces.
Choosing an arbitrary size without checking can lead to frustrating mistakes, such as shaving off too much leather or barely making a dent. Match the size number accurately to the thickness of your leather.
The most versatile sizes that see the most action are No. 1 and No. 2. If you are a beginner buying your very first beveler, I strongly recommend a No. 2 (or manufacturer size around 1.0mm blade width), which handles leather around 1.5mm to 2.0mm thick. This covers a wide spectrum of projects from small accessories to small bags.
Leathercraft features several tools that look or sound similar to edge bevelers. Knowing these distinctions will prevent accidental purchases or misapplication.
Tools like French skivers (or safety bevelers/skiving knives) are designed for leather skiving—thinning out an entire edge area. While an edge beveler trims roughly 1 millimeter off the sharp corner in a thin line, a French skiver thins down a width of several millimeters to centimeters from the edge inward. Because their purposes are entirely different, a French skiver cannot be used as a substitute for an edge beveler.
Some crafters wonder, "Can't I just hold a utility knife at an angle and shave the edge?" In short: please refrain from substituting a utility knife or Japanese leather knife for an edge beveler.
Consistently trimming a uniform 1mm off a leather corner with a utility blade is extremely difficult, even for seasoned professionals. Your hand can easily slip, creating jagged, uneven edges, or worse, the blade might gouge directly into the face of your precious project, ruining it completely.
An edge beveler is a purpose-built tool specifically engineered to yield flawless, uniform corner trims effortlessly. If you want to craft beautiful leather goods, investing in a proper beveler is the ultimate shortcut.
Now that you know why edge bevelers matter and how they work, let's talk about purchasing guidelines. Buying a poor-quality tool without knowing what to look for can cause immense frustration and spoil your enjoyment of leathercraft.
When starting leathercraft, many people purchase budget beginner kits online. However, exercise caution with the edge bevelers bundled in inexpensive sets.
These bundled tools often have poorly aligned cutting surfaces and lack sharpness right out of the box. Pushing a dull beveler against leather will fail to slice smoothly; instead, it crushed, stretches, or tears the leather corner, leaving a dreadful mess.
When beginners struggle with beveling, 90% of the time it isn't due to lack of skill—it's simply because the tool's blade is dull. If your kit tool struggles to cut, switch without hesitation to a standalone edge beveler from a dedicated tool manufacturer.
If I were starting over, I would never buy an unbranded tool under $10 USD. To enjoy that satisfying, effortless glide without stress, I recommend investing in a single edge beveler priced around $15 to $35 USD from trusted Japanese leathercraft brands like Craft Sha, Kyoshin Elle, or specialized tool makers.
Tools in this price range come properly sharpened out of the box and are made from quality steel that holds an edge well. Starting with a sharp tool from day one is the fastest path to improvement and saves you money by preventing re-buildups of cheap gear.
Here is the detailed process for achieving smooth, ribbon-like leather shavings. Having a good tool is only half the equation; applying proper technique is essential.
To prepare your workplace, lay your leather flat on a self-healing cutting mat so it cannot shift. If the leather moves during a stroke, your cut width will become wavy.
Spread the fingers of your non-dominant hand firmly on the leather piece to hold it down. For long, straight cuts, you can lay a heavy ruler along the leather and press down firmly. Safety Note: Never place your off-hand in front of the blade's path! Keep your supporting hand behind or to the side of the direction you are cutting.
Hold the beveler in your dominant hand and bring the blade to the leather edge at a 45-degree angle. This is the golden angle for shaving a balanced, symmetrical bevel.
If your angle is too shallow (too horizontal), the blade will catch on the surface (grain side) and barely cut. If the angle is too steep (too vertical), the blade digs into the edge wall and stalls. Once you establish the 45-degree angle, lock your wrist in position and slide your entire arm forward from the elbow.
When pushing the beveler, move forward decisively in one continuous motion from start to finish. Stopping midway or shifting pressure creates noticeable notches or jagged steps along the cut line.
Push the blade with consistent speed and pressure, and a delicate, continuous string of leather shaving will curl up smoothly. Practice this feel until it becomes second nature!
Leather fibers have a directional flow, much like wood grain. Slicing along the direction of the fibers is called cutting with the grain; slicing against it is cutting against the grain.
When cutting with the grain, the beveler glides effortlessly. However, if you cut against the grain, the blade catches on the fibers, pulling or tearing the leather surface.
If you feel resistance or notice a rough, uneven texture while beveling, stop immediately! Rotate your leather piece 180 degrees and bevel from the opposite direction. You will be amazed at how smoothly it cuts. Knowing when to flip your piece is a rule practiced constantly by professional crafters.
Here are three common troubleshooting scenarios beginners encounter, along with practical solutions you can apply right at your workbench.
This issue occurs frequently when working with soft leathers (such as chrome-tanned or thin soft leather) or when using a dull blade.
Soft leather yields under forward pressure, stretching or bunching up instead of cutting clean. Try these two solutions:
Inconsistent bevel width stems from shifting hand pressure or a wobbling wrist angle.
To fix this, don't rely solely on your dominant hand to push the tool. Hold the beveler in your dominant hand, and gently rest the thumb of your non-dominant hand against the back of the blade shaft. Use that thumb to guide and assist the forward stroke. This stabilizes your wrist completely, delivering impressively straight, uniform cuts.
Beveling straight edges is straightforward, but rounded corners (such as on wallet flaps or pocket corners) can be tricky.
The secret to smooth rounded corners is to rotate the leather piece with your non-dominant hand in rhythm with your stroke, rather than trying to twist the tool around the curve. Keep your beveler locked at a 45-degree angle and slide it forward while rotating the leather underneath it. This creates a beautifully fluid arc.
No matter how high-quality your edge beveler is, regular contact with leather fibers will eventually dull the cutting edge. Rather than buying a replacement when it slows down, learn simple maintenance to restore its keen edge instantly.
Because the groove of an edge beveler blade is tiny, you cannot sharpen it on a conventional flat whetstone. However, using basic materials around your workspace, you can perform a quick leather/cardboard strop in about three minutes.
To maintain your tool, you need a piece of thick cardboard (or leather scrap), thick sewing thread (or cord), and a polishing compound such as green chromium oxide (often called Aobō or green rouge in Japanese craft setups).
Important: Never push forward when stropping, or the blade will slice into your card. Always pull backward! This simple stropping action strips away micro-burrs and leather residue, restoring a razor-sharp glide. Making it a habit to strop your tool a dozen times before starting a project keeps your edge beveler cutting like new every single time.
At first glance, an edge beveler might seem like a modest tool. Yet, it is the single most vital instrument for transforming a project from a rough homemade craft into a polished, professional leather good.
Let's recap the key takeaways:
Leather items crafted with properly beveled edges feature smooth, rounded profiles that feel delightful in your hands every time you touch them. That effortless gliding sensation as thin ribbons peel away makes edge beveling one of the most rewarding steps in crafting!
Pick up a sharp edge beveler, and enjoy elevating your leathercraft journey to the next level!
If you enjoyed this guide, please consider sharing it with your fellow crafters on social media or messaging apps—it means the world to me! See you in the next article! This was Yassy from Crafters!


For example, if you are looking for articles about mizuhiki, try searching for "mizuhiki"; if you are interested in tools, try keywords like "nippers" or "pliers."
