Adding a single stamped accent to your handmade creations can instantly transform their atmosphere, giving them a polished, professional finish. Personally, I love looking at stamps, buying them, and using them on my own handmade projects—so much so that my collection has completely outgrown my display shelves!
From shop business cards and packaging embellishments to paper crafts, fabric accessories, and faux-embossed impressions on leather, stamping is an indispensable, versatile technique in the crafting world.
However, when crafters set out to build their toolset, almost everyone hits the same big question: "Should I get rubber stamps or clear stamps? Which one is actually better?"
While they look and feel entirely different, the divergence goes far beyond mere materials. The pressing feel, ease of positioning, ink pickup, long-term durability, and the tasks each excels at are fundamentally different.
If you choose simply because a design looks cute without understanding these traits, you risk common stamping blunders—like misaligned prints that ruin a finished piece, or uneven, patchy impressions where ink fails to transfer cleanly.
Having tested and used countless stamps over the years, I want to break down the crucial differences between rubber stamps and clear stamps from an experienced crafter's perspective. Here is everything you need to know: the pros and cons of each, common beginner mistakes, techniques to prevent errors, and my absolute golden rules for choosing the right stamp for every project!
Before diving into techniques, it helps to understand how rubber stamps and clear stamps are constructed. Once you see how they are built, it becomes immediately clear why they feel and perform so differently.
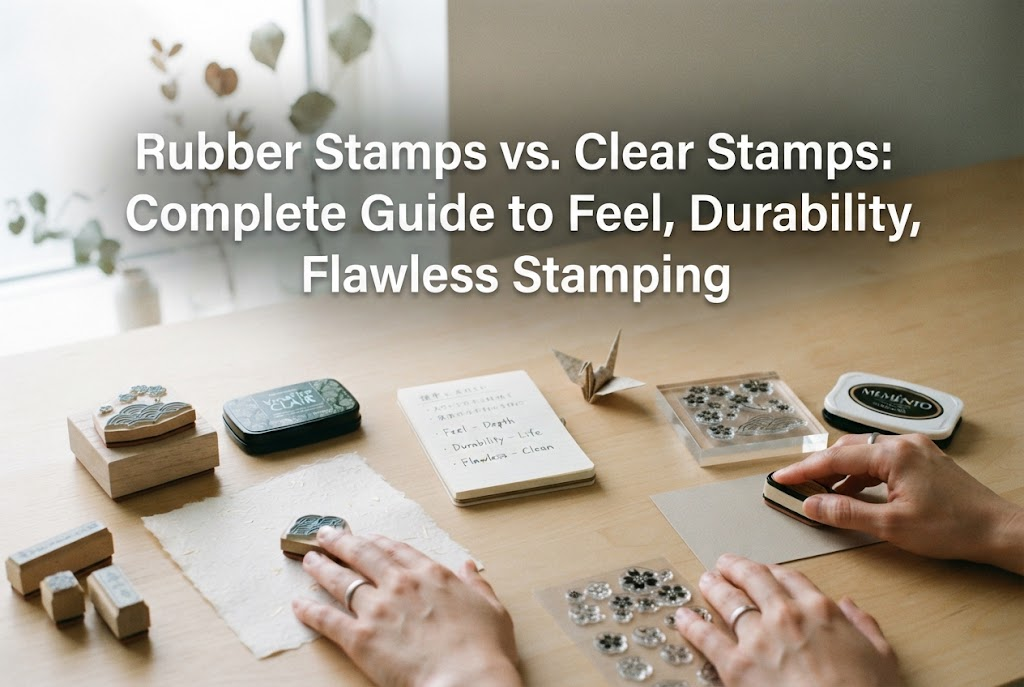
The Warmth of Wood and Rubber: Anatomy of a Rubber Stamp
Rubber stamps are the time-tested classic. They consist of a rubber die carved or molded with the design, mounted onto a handle—typically a wooden block or molded resin handle.
Crucially, most traditional rubber stamps feature a spongy cushion layer sandwiched between the rubber die and the wooden mount. This cushion plays an essential role: it evenly distributes downward pressure across the entire surface as you press.
The rubber surface itself is commonly made from natural red rubber, vulcanized black rubber, or durable synthetic compounds. All of these offer excellent resilience and elasticity. Rubber stamps have a satisfying, solid heft that feels like a classic, well-crafted workbench tool in your hand.
Completely Transparent: Anatomy of a Clear Stamp
Clear stamps have become massively popular in modern crafting. They are made from flexible polymers—such as silicone resin, thermoplastic elastomer (TPR), or photopolymer resins—and arrive as completely transparent, pliable flat sheets.
Unlike traditional rubber stamps, clear stamps do not have built-in wooden mounts. To use them, you temporarily peel a stamp from its backing sheet and press it onto a separate, transparent acrylic block. Due to the inherent cling of the material, no adhesive is required; they stick securely and can be removed and repositioned again and again.
Their standout quality is complete transparency. When you look down through the acrylic block, you can see right through the stamp to the exact surface of the paper or fabric underneath.
Rubber Stamps: Strengths, Weaknesses, and Common Mistakes
Traditional wood-mounted rubber stamps have stood the test of time for very good reasons. At the same time, they do present specific challenges for beginners.
5 Key Advantages of Rubber Stamps
The greatest strength of a rubber stamp is its forgiving nature and the superior clarity of its print.
Consistently Clean Impressions: Thanks to the density of the rubber and the internal foam cushion, pressure distributes evenly even if your hand tilts slightly. You rarely end up with an impression that is faint in the center or blotchy at the edges.
Exceptional Durability: Rubber is an extraordinarily tough material. Kept clean and stored reasonably well, a good rubber stamp can easily last 10, 20, or more years without degrading.
Compatible with Almost All Inks: Rubber stands up to water-based dye inks, pigment inks, fabric inks, and even harsh solvent-based permanent inks (such as those formulated for glossy, non-porous surfaces) without dissolving or softening.
Superior Ink Adhesion: Rubber surfaces feature microscopic texture that holds ink evenly without beading up, yielding rich, crisp, opaque prints.
Tactile Satisfaction: Gripping a solid wooden mount and pressing it firmly down delivers a uniquely satisfying, grounded crafting experience.
Drawbacks to Keep in Mind
Despite their qualities, rubber stamps have clear functional limitations:
Blind Placement: Because of the opaque wooden mount, you cannot see precisely where the stamp die meets the surface beneath it. You have to gauge placement by eye, making sub-millimeter precision difficult without dedicated stamp positioning tools.
Bulky Storage: Wooden handles take up substantial volume. As your collection expands, finding storage space can quickly become a challenge.
Higher Price Point: Due to manufacturing costs and mounting materials, wood-mounted rubber stamps are generally more expensive individually than clear stamp sets.
Common Beginner Pitfalls with Rubber Stamps
The most common mistake beginners make is applying brute force. Because the wooden handle feels solid, it is tempting to press down as hard as possible. Doing so often forces the non-design shoulders and corners of the rubber into the ink and onto the paper, leaving unwanted border smudges and halo lines. Another frequent stumbling block is missing your intended alignment by a few millimeters, throwing off an otherwise neat layout.
amazon.comShop the MaterialsFind craft supplies and materials on Amazon.com.Explore on Amazon.com →
Some content displayed on this site is provided by Amazon. This content is provided as-is and may be changed or removed at any time.
Clear Stamps: Strengths, Weaknesses, and Common Mistakes
Clear stamps have revolutionized modern paper crafting. While they offer incredible versatility, they also have unique quirks that can catch beginners off guard.
5 Key Advantages of Clear Stamps
The defining strength of clear stamps is surgical placement accuracy and design flexibility.
Pinpoint Alignment: Because both the stamp and the acrylic mount are crystal clear, you look directly through them from above. Positioning a sentiment precisely inside a printed box or centered underneath a line of text is virtually foolproof.
Compact Storage: Being thin sheets, hundreds of clear stamp sets can be organized flat inside binders or storage sleeves, taking up only a fraction of a bookshelf.
Cost-Effective: Clear stamps are frequently sold in themed sheets packed with coordinated illustrations, borders, and typography, offering significant design variety at an accessible price.
Customizable Layouts: You can arrange multiple clear stamps—such as a sentiment alongside floral accents—onto a single acrylic block to stamp an entire custom composition in one press. Because the material is flexible, you can even gently curve word stamps into arcs.
Effortless Multi-Step Stamping: Layering different colored inks to build complex, multi-tonal illustrations is remarkably straightforward because you can see previous layers clearly through the block.
Drawbacks to Keep in Mind
Despite their appeal, clear stamps require specific handling to avoid disappointing results:
Requires Finesse to Prevent Smudging: Clear stamps lack a built-in foam cushion. When pressed against hard surfaces via a rigid acrylic block, there is no give. Pressing too lightly can leave faint spots in the center, while pressing too firmly squashes the flexible polymer, thickening and blurring fine lines.
Ink Beading on New Stamps: Fresh clear stamps often feature a slick surface that repels water-based inks, causing ink to bead up into tiny droplets rather than coating smoothly, resulting in mottled prints.
Susceptible to Aging and UV: Polymer stamps gradually yellow over time when exposed to sunlight, humidity, and certain ink chemicals. With age, lower-grade polymers may dry out, lose their cling, or turn brittle.
Sensitive to Harsh Solvents: Aggressive solvent-based inks (such as standard StazOn formulations) and harsh chemical stamp cleaners can damage, degrade, or dissolve certain clear polymer stamps over time.
Common Beginner Pitfalls with Clear Stamps
The number-one mistake with clear stamps is pressing down with your full body weight out of an eagerness to ensure good coverage. This squashes the soft design lines, turning crisp lettering into blurry, indistinct shapes. Another frequent issue occurs during cleanup: digging a fingernail under the edge of a stamp to yank it off the acrylic block can stretch or tear delicate designs.
Direct Comparison: Rubber Stamps vs. Clear Stamps
Here is how the two styles compare across five core practical criteria:
1. Ease of Stamping & Forgiving Nature
Winner: Rubber StampsThe built-in sponge cushion absorbs slight hand wobbles and uneven pressure. Even without practiced technique, rubber stamps reliably produce a full, clean impression.
2. Alignment & Precision
Winner: Clear StampsBeing able to see completely through the block and stamp makes clear stamps unbeatable for precision placement within planners, journal grids, or tight pre-printed areas.
3. Crispness and Richness of the Line
Winner: Rubber StampsThe firmness and texture of rubber hold ink uniformly without beading, delivering deep, razor-sharp outlines and consistent coverage across solid shapes.
4. Storage Space & Budget
Winner: Clear StampsA vast collection of flat sheets can easily fit into a single three-ring binder, and multi-design sheets provide far more individual motifs per dollar than mounted wood blocks.
5. Longevity & Durability
Winner: Rubber StampsQuality rubber can easily last decades under regular use. Polymers will eventually degrade, yellow, or lose flexibility over years of handling and exposure to light.
How to Choose: The Golden Rules for Your Projects
Still wondering which type fits your crafting setup best? Here is how I divide their roles in practical studio work:
When You Should Definitely Choose Rubber Stamps:
Mass-Producing Tags and Packaging: When stamping brand logos or "Thank You" messages onto dozens or hundreds of items, speed and consistency trump transparent alignment. You can stamp rhythmically and achieve clean prints every time.
Stamping on Textured Surfaces (Fabric, Leather, Wood): Working on textured, slightly uneven substrates requires durable inks and an adaptable surface. Rubber stamps handle heavy-duty inks effortlessly, and the foam cushion conforms to surface variations.
Creating Vintage or Distressed Aesthetics: The authentic, grounded look of traditional rubber gives distressed inks a natural, organic presence.
Core Brand Identity & Permanent Assets: For signature stamps, maker marks, or shop logos you plan to use for years, invest in a custom wood-mounted rubber stamp.
When You Should Definitely Choose Clear Stamps:
Planners, Bullet Journals, and Agendas: Aligning stamps precisely inside calendar grids, margin checklists, or next to handwriting requires see-through visibility.
Paper Crafting & Detailed Card Making: Centering a sentiment perfectly inside an ornate illustrated frame or aligning multi-step stamped illustrations works best when you can look straight down through the design.
Layered Color Compositions: Aligning secondary layers (such as petals over flower stems) demands visual confirmation before contact.
Seasonal Designs Used Occasionally: Holiday motifs (Halloween, Christmas, New Year) are best collected on affordable, space-saving clear stamp sheets rather than bulky wood blocks.
Pro Tips for Flawless Results with Both Formats
Here are a few studio tricks to help you get professional results regardless of which stamp type you hold:
Mastering Rubber Stamps
Tap the Pad to the Stamp: Instead of smashing the stamp face-down into an ink pad, hold the stamp with the rubber design facing upward toward the ceiling. Gently tap the ink pad down onto the rubber surface repeatedly. This ensures ink coats only the raised lines, preventing buildup in the recesses.
Press Firmly and Hold for Three Seconds: Apply steady, direct downward pressure without rocking, wiggling, or twisting the wooden mount. Hold for about three seconds to allow the paper fibers to absorb the ink evenly.
Clean Promptly: Stamp off excess ink onto scratch paper until clear, then wipe the rubber surface with an alcohol-free damp wipe or moist cloth. Never let pigment dry hard inside detailed grooves.
Overcoming Clear Stamp Inking Issues
The Eraser Trick for New Clear Stamps: If a brand-new clear stamp beads up ink, lightly rub the stamping surface with a clean vinyl pencil eraser, or press and peel masking tape across the surface several times. This removes factory mold-release residues and conditions the polymer surface so ink coats smoothly.
Always Stamp Over a Cushion Mat: Because clear stamps lack an internal foam layer, always place a stamping mat, smooth leather scrap, or craft foam mat beneath your paper. This soft base compensates for the rigid acrylic block and prevents hollow, faded centers.
Peel Gently with the Pad of Your Finger: When removing a stamp from an acrylic block, avoid lifting it with your fingernails. Use the soft pad of your thumb to gently roll the stamp up from the corner so the polymer does not stretch or rip.
Reviving Stickiness: If clear stamps collect dust and fail to cling to acrylic blocks, wash them gently in lukewarm water with a drop of mild dish soap and allow them to air dry. Their original cling will return immediately.
Choosing the Right Ink Pad
Even the finest stamp will underperform if paired with an incompatible ink. When working on paper, pigment ink is an excellent choice: it offers rich, opaque color, dries with strong water resistance, and resists bleeding through paper fibers.
For specialty surfaces like fabric, leather, or glossy coatings, select dedicated multi-surface or fabric inks. Keep in mind that fast-drying solvent inks (like standard StazOn) can degrade clear polymer stamps over repeated use. Always check product guidelines to ensure an ink is polymer-safe, or stick to water-based and archival pigment inks when using clear stamps.
Summary: Matching the Stamp to Your Craft
Both rubber stamps and clear stamps have established, irreplaceable roles in a craft workspace:
Rubber stamps deliver unmatched consistency, forgiving cushion, rich line depth, and decades of durability. They are the ideal choice for repeat production, custom branding, and mixed-media surfaces.
Clear stamps offer peerless see-through alignment, effortless layering, compact storage, and great design variety on a budget. They are unmatched for journaling, card layouts, and intricate paper crafts.
Neither is universally superior; each excels in different situations. Understanding these core characteristics allows you to choose with confidence, ensuring clean, satisfying impressions on every handmade piece.
If you found this comparison helpful, feel free to share it with your fellow crafters! Happy making, and I will catch you in the next guide! This was Yassy from Crafters!
■You can search using keywords to find information on topics that interest you or things you want to look up.
For example, if you are looking for articles about mizuhiki, try searching for "mizuhiki"; if you are interested in tools, try keywords like "nippers" or "pliers."
Search on Amazon.comFind these items and more on Amazon.com.