How to Choose and Use Precision Glue Nozzles: Achieve Clean, Zero-Overflow Craft Bonding
yassy
Crafters!

Hello, this is Yassy from Crafters! (・∀・)
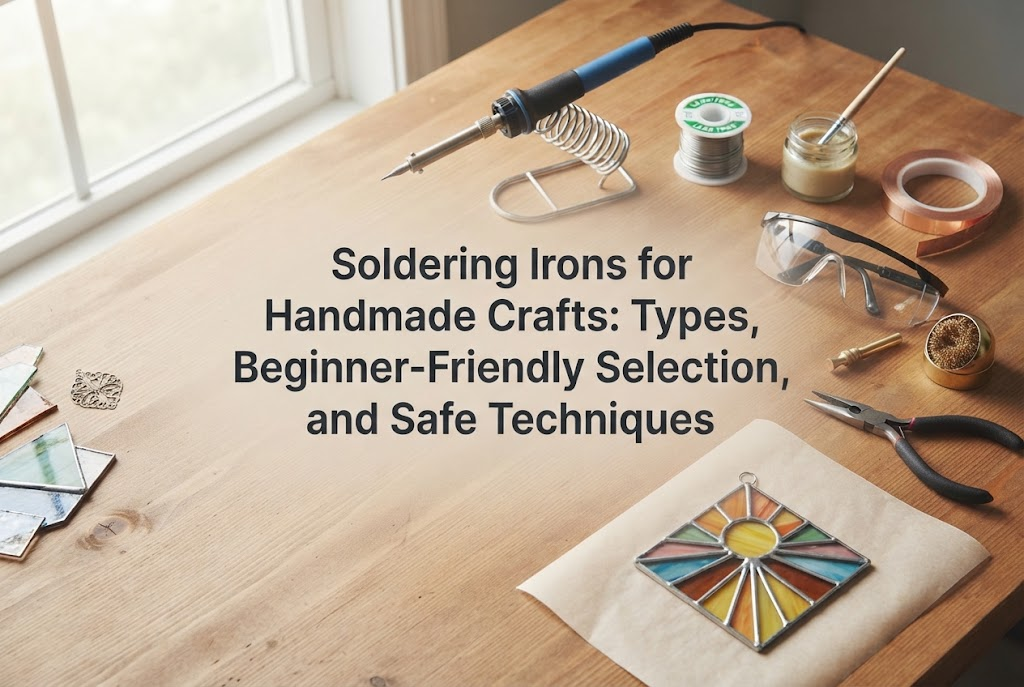
When it comes to securely joining metal pieces together or creating enchanting stained glass suncatchers and ornaments, there is one indispensable tool: the soldering iron.
For many crafters, especially when just starting out, a soldering iron might carry the intimidating image of a complex electronics tool—one that feels scary to pick up due to concerns about burns or fire hazards.
However, once you understand how it works and how to use it correctly, a soldering iron becomes a reliable partner that dramatically expands your creative range. It gives your projects a level of strength and a distinct, substantial texture that craft adhesives could never achieve.
I personally enjoy making, viewing, and collecting a wide variety of handmade items, and I am convinced that three-dimensional creations and glass crafts crafted with soldering techniques hold a unique, singular beauty.
In this guide, I will walk you through the roles and varieties of soldering irons, how they fundamentally differ from similar heated tools, what specifications beginners should look for, and the practical techniques needed to achieve clean results every time.
A soldering iron is a thermal tool designed to melt solder—a metal alloy—in order to bond metal components together.
In the handmade crafting community, a soldering iron is far more than a simple repair instrument or an electronics gadget. It serves as a vital structural tool that actually builds and shapes your artwork.
Here are some of the primary ways soldering irons are used across different handmade crafts.
Stained glass is easily the craft where a soldering iron shines brightest. After wrapping the edges of cut glass pieces with copper foil tape, you use the soldering iron to melt metal along the seams, fusing the individual components together.
From suncatchers and mini lamp shades to glass trinket dishes, all these light-transmitting pieces are brought to life through this technique. The raised solder seams also double as strong, polished outlines that frame and define the entire design.
Soldering irons also demonstrate immense value when assembling three-dimensional home decor from bent brass or copper wire, as well as when joining components for metal jewelry.
Whether forming sculptural plant motifs composed of fine metal wires or securely anchoring sturdy keychain findings, soldering is vital wherever adhesives simply lack structural strength.
Soldering irons frequently appear in miniature making and dollhouse construction as well.
Beyond assembling delicate metal furniture pieces and miniature railings, they are used to wire LED lights and battery boxes to illuminate miniature interior rooms.
Beginners often ask: "Can't I just use heavy-duty glue for metal?" To put it plainly, the joint strength is on a completely different level.
Adhesives merely stick surfaces together using the adhesion of a resin layer. Because of this, there is an ongoing risk of parts suddenly separating over time due to impacts, temperature changes, or pulling stress.
Soldering, by contrast, involves molten metal bonding directly with the surface of the base metal at a molecular level. When soldered correctly, the joint will never pull apart with bare hands. For suspended decor or jewelry that experiences everyday handling, soldering is the definitive answer.
Several heated craft tools closely resemble a soldering iron in appearance. Because beginners often mix these up when shopping, let us clearly distinguish them.
The tool most commonly confused with a soldering iron is the pyrography or wood burning pen, used for burning illustrations onto wood or leather.
While they look almost identical, their functionality and thermal characteristics are entirely different. Pyrography pens are built to deliver pinpoint heat to scorch organic surfaces. The moment their tip touches metal, the heat is rapidly drawn away and the temperature plunges, meaning they cannot effectively melt solder.
Conversely, pressing a soldering iron into wood burns the surface too coarsely because the tip is designed differently, making precise drawing impossible. They cannot be used as substitutes for one another.
Heat guns and embossing heaters blow a focused stream of hot air from their nozzles. They are commonly used to pop bubbles in UV resin, expand embossing powder, or shrink plastic sheets.
Because they disperse hot air broadly, they cannot heat a specific metal spot to over 300°C (572°F) to melt solder.
Glue guns melt cylindrical sticks of thermoplastic resin, bonding materials together as the melted plastic cools and solidifies.
While handy, glue guns extrude plastic, not molten metal. Resin glue lacks heat resistance, builds up substantial thickness, and cannot create the clean structural lines of stained glass or form rigid metal-to-metal joints.
Soldering irons are classified by their internal heating elements. Which type you choose drastically impacts both ease of use and final project quality.
This is the traditional, budget-friendly style that uses nichrome wire as its heating core.
Because they are inexpensive and readily found at home improvement stores, beginners often purchase them first, but caution is warranted when using them for crafts.
They typically take 3 to 5 minutes or more to reach working temperature. More critically, when you touch the tip to a large piece of metal or a glass edge, the heat quickly drains into the work piece. The tip temperature drops sharply, causing the solder to freeze prematurely.
These modern irons utilize ceramic heating elements. They reach operating temperatures within 10 to 20 seconds after being turned on.
Their biggest advantage is exceptional thermal recovery. When heat is transferred into the metal component, an internal sensor responds almost instantly to reheat the tip, maintaining a steady temperature for smooth, uninterrupted crafting.
For projects requiring continuous soldering seams, a ceramic heater model is an essential choice.
These irons feature a dial or digital buttons on the handle or base that let you adjust the tip temperature freely, typically between 200°C and 450°C (392°F to 842°F).
This is the type I recommend most strongly for handmade crafters.
Large thermal loads like stained glass seams require different heat levels than intricate, delicate wire jewelry. If the temperature is too high, soldering flux evaporates instantly and scorches; if it is too low, the solder will not melt smoothly. The ability to maintain a consistent, tailored temperature is the best defense against beginner mistakes.
These portable tools can be used away from electrical outlets. While convenient for outdoor touch-ups, their heat output can be unstable and runtime is limited. For crafting comfortably at a dedicated indoor workbench, nothing matches the stability of a corded iron. A cordless iron is generally unnecessary for everyday craft making.
You cannot solder with the iron alone. Here are the core supplies you will need alongside your soldering iron.
Solder is the metal alloy wire used to make joints. It comes in two primary types: leaded solder and lead-free solder.
Leaded solder has a low melting point (around 183°C / 361°F) and flows smoothly, making it very forgiving to work with. For stained glass suncatchers and general decorative crafts, leaded solder is favored for ease of handling.
Lead-free solder is an alloy typically made of tin, silver, and copper, formulated to eliminate lead for health and environmental safety. It has a higher melting point (around 217°C–220°C / 422°F–428°F) and solidifies faster, requiring a bit more practice. For wearable metal jewelry that touches the skin directly, choose lead-free solder for safety.
Flux is a liquid chemical preparation that beginners often overlook, yet it is arguably the most vital supply.
Metals naturally form an invisible oxide layer when exposed to air. If you attempt to solder over this oxide layer, the molten metal will bead up into balls and roll off without adhering.
Applying flux to the joint chemically clears away the oxide film, allowing the melted solder to wet out smoothly across the metal surface. Soldering without flux is virtually impossible, so make sure to get it along with your iron.
Because the iron reaches temperatures above 300°C, a stable soldering iron stand is mandatory. Avoid flimsy stamped-sheet stands; choose a weighted, purpose-built stand that will not tip over.
You will also need a dampened cellulose sponge or a brass wire tip cleaner to wipe away burnt residue and oxidation from the iron tip during use.
To shield your craft desk from stray drops of molten solder, lay down a heat-resistant silicone mat or a specialized craft soldering sheet across your entire work area.
Desoldering braid is a fine copper mesh used to remove excess solder or correct mistakes. By placing the braid on the joint and pressing the hot tip against it, excess solder is drawn up into the copper weave. It is an indispensable safety net for repairs.
To avoid frustration when purchasing your first tool, use these practical criteria:
Resist the temptation to buy a bare-bones nichrome iron just because it is cheap. You will likely struggle with cold joints or scorched flux.
Invest in an iron with a ceramic heater and onboard temperature control. While slightly more expensive, this single decision eliminates the majority of beginner soldering difficulties.
Traditional advice often suggested that stained glass requires 60W to 100W, while small crafts need 20W to 30W. However, with modern temperature-regulated ceramic irons, a 50W to 70W tool can dynamically pump heat into the tip as soon as it detects a drop in temperature. Focus on temperature controllability rather than sheer wattage ratings.
Soldering tips wear out over time, and different projects require different tip geometries. Common tip profiles include conical "B" tips, chisel "D" tips, bevel "C" tips, and knife-style "K" tips.
For stained glass seams or broad decorative lines, flat chisel (D) or bevel (C) tips provide superior heat transfer. Select an iron from an established manufacturer that allows quick and easy tip changes.
Once your tools are assembled, the success of your project rests entirely on your heating sequence. Here is the reliable sequence for producing smooth, strong joints.
Oils from fingertips and stray dust on copper foil or wire will repel molten solder. Wipe down the joints with rubbing alcohol or an alcohol wipe before starting.
Use a small brush to coat the seam with flux. Applying too little will lead to uneven, lumpy solder lines. Ensure the entire joint area is lightly covered.
This is where beginners most commonly stumble. Melting a blob of solder onto the iron tip and trying to drip it onto a cold joint leads to what is known as a "cold solder joint"—a weak, rounded lump with zero bond strength.
The correct method is to place the hot tip directly onto the metal component (the base material) and hold it there for 2 to 3 seconds to bring the metal up to temperature.
Once the base metal is sufficiently hot, feed your solder wire into the junction where the tip meets the metal. The heat of the base metal will melt the solder, causing it to flow smoothly across the seam. Once enough solder has flowed into place, pull the solder wire away, then gently lift the iron tip away.
Solder solidifies within 2 to 4 seconds. If parts shift while the solder is passing from liquid to solid, the joint will develop internal fractures, turning dull gray and rough. Keep parts firmly clamped or held with tweezers until completely set.
Once finished, thoroughly wash the piece using water and mild soap, or a dedicated flux cleaner. Flux is acidic or mildly acidic; leaving it on the finished piece can cause green oxidation (verdigris) or dark corrosion over time. Dry the project thoroughly after cleaning.
If your soldering does not go as planned, here is how to quickly identify and fix the issue:
Cause: The base metal is not hot enough, or flux is missing.Solution: Pause, reapply flux, and ensure you hold the iron tip against the metal base for an extra second or two before feeding the solder. The solder will wet out cleanly once the metal reaches temperature.
Cause: The joint was heated too long (evaporating all the flux), or the iron tip was pulled away too abruptly.Solution: Brush on a tiny touch of fresh flux and lightly reheat the seam with the tip. Surface tension will instantly pull the solder back into a smooth, rounded contour.
Cause: Thermal shock caused by holding the hot tip in one spot for too long.Solution: Never leave the iron on glass for more than 2 to 3 seconds. For long seams, solder in short, staggered segments to distribute heat evenly.
Operating a tool that heats up to 300°C–400°C requires careful safety awareness. Always observe these precautions:
The white smoke rising during soldering is vaporized flux, not the metal itself. Inhaling these fumes can irritate your eyes, nose, and throat. Always run a ventilation fan, open two windows to create cross-ventilation, or use a compact tabletop fume extractor.
In the middle of focused crafting, it is easy to accidentally set an iron on the table without thinking. Keep your weighted stand within easy reach on your dominant-hand side.
Additionally, make sure the power cord is routed safely along table legs so your arm or foot cannot snag it and pull the iron off the bench.
Before switching off the iron at the end of a session, melt a generous amount of fresh solder onto the tip to coat it. Leaving the tip exposed to air as it cools causes the metal plating to oxidize, creating a blackened crust that blocks heat transfer the next time you turn it on. Keeping the tip "tinned" protects it for your next project.
While soldering irons can appear intimidating at first glance, the underlying technique is straightforward.
By choosing a temperature-regulated ceramic iron, applying flux, and heating the base metal before feeding solder, even first-time crafters can achieve clean, sturdy results right from day one.
From the structural strength that adhesives cannot provide to the luminous lines of stained glass and the warmth of shaped wire crafts, adding a soldering iron to your creative toolkit opens up boundless possibilities.
Choose your tools thoughtfully, keep safety at the forefront, and enjoy bringing your unique three-dimensional designs to life!
If you found this guide helpful, please share it with your fellow makers. See you in the next article—this was Yassy from Crafters!




For example, if you are looking for articles about mizuhiki, try searching for "mizuhiki"; if you are interested in tools, try keywords like "nippers" or "pliers."
