Types of Silicone Molds for Crafting and How to Choose the Perfect One Without Fail
yassy
Crafters!

Hello, this is Yassy from Crafters! (・∀・)
When hand-crafting small leather goods, have you ever struggled with stitches that won't align neatly, or noticed your thread wearing out and snapping over time? To elevate both the quality and durability of your leatherwork in one go, there is an indispensable tool you need to know about: the stitching groover.
I personally love making, looking at, and buying all kinds of handmade crafts. When examining high-end leather goods in boutiques, you will often notice that the hand-stitched threads sit recessed inside a fine trench below the leather's surface. The specialized tool used to carve this trench—allowing the thread to sink beneath the surface—is the stitching groover.
In this guide, I will thoroughly explain everything from the fundamental role and mechanism of the stitching groover to step-by-step techniques, key differences from similar tools, and how to choose the right one without mistakes. Once you master this tool, your leathercraft projects will look remarkably refined and hold up much longer.
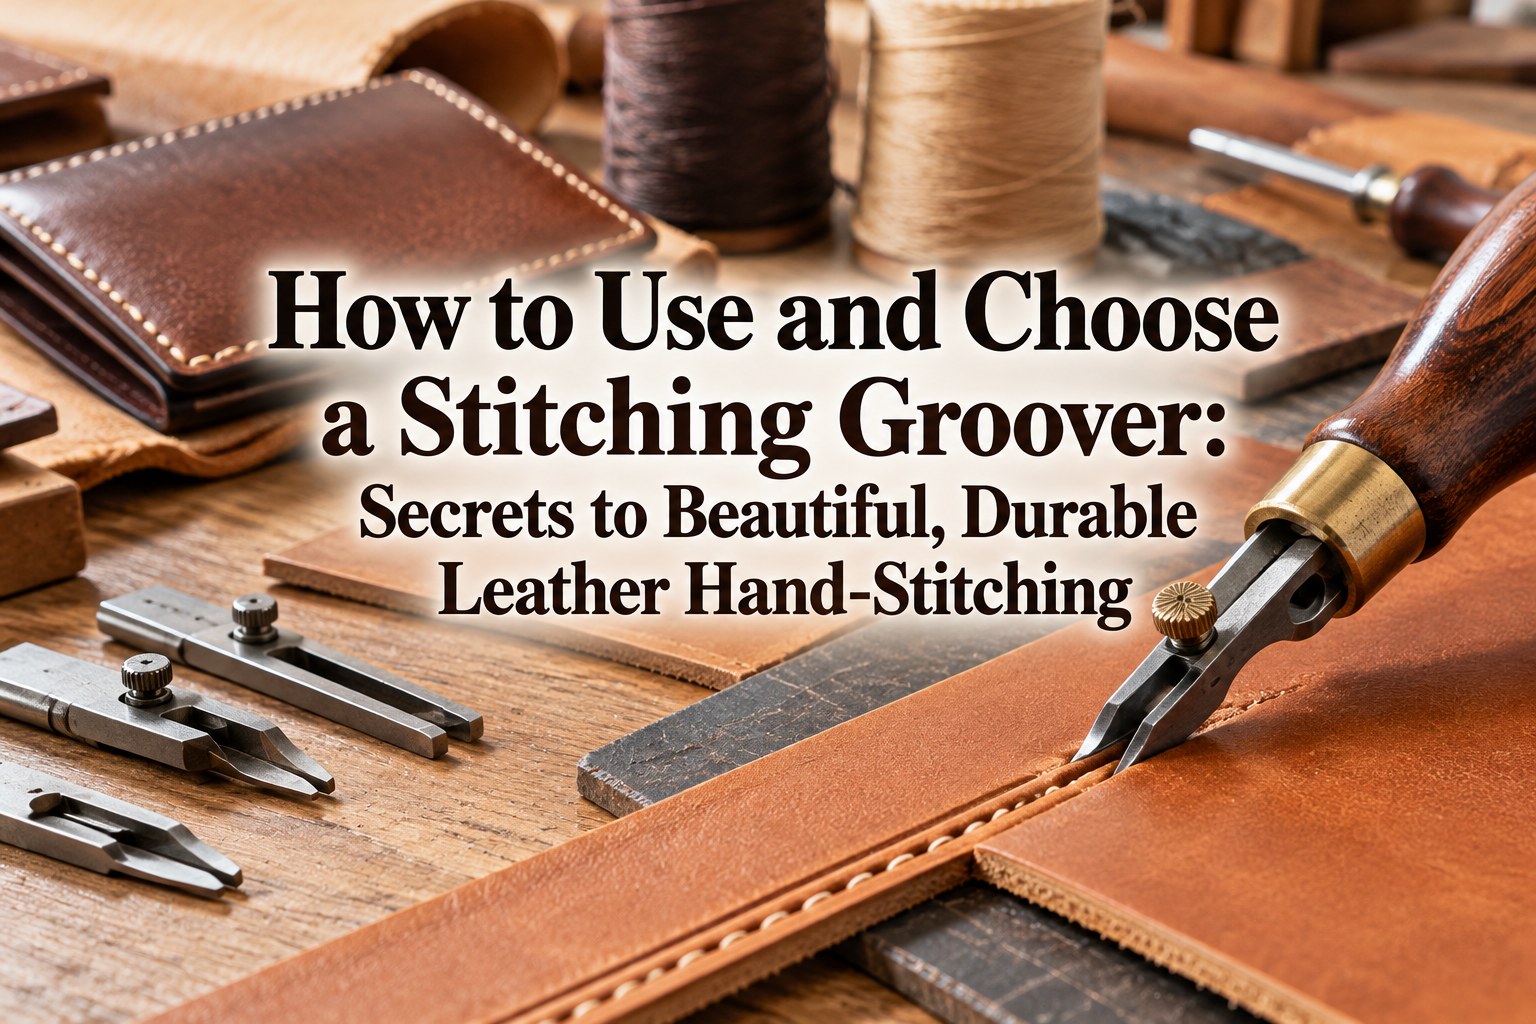
A stitching groover is a specialized leathercraft tool designed to carve a shallow channel (groove) into the leather's surface at a consistent distance from the edge (koba). By resting the attached guide fence against the edge of the leather and pulling the tool toward yourself, you can easily gouge an even, parallel groove.
Its defining feature is that it does not merely mark a line—it is an actual cutting blade that shaves away leather fiber. In leathercraft, using a stitching groover serves two primary purposes:
The construction of a stitching groover is remarkably simple yet precisely engineered. It generally consists of four main parts: the handle (grip), the shaft, the guide fence, and the grooving cutter tip.
Near the tip of the shaft sits a tiny cutter with a miniature hole. Much like a wood planer, this blade shaves a micro-thin strip of leather from the surface, feeding out a delicate, thread-like curling shaving.
Extending beside the cutter is the guide fence, designed to glide along the side edge of the leather. The distance between the guide and the blade can be adjusted freely by loosening a screw. For example, if you want your stitch line positioned 3 mm from the edge, you set the gap to 3 mm and tighten the screw securely.
Thanks to this mechanism, anyone can carve a channel perfectly parallel to the edge of the leather without needing a ruler. The tool is inherently designed to eliminate the wobbles and inconsistencies of freehand work.
Stitching groovers generally fall into two broad categories: dedicated single-purpose models and multi-functional models. Understanding their respective strengths will help you decide which one fits your bench best.
This style of groover is built purely for cutting grooves. Because it lacks interchangeable head attachments, its build is exceptionally solid, and the blade and guide are far less prone to shifting or wobbling mid-stroke.
With zero play in the shaft, you can consistently gouge channels of exact depth and width. Because the settings remain rock-solid once locked in, this is an extraordinarily reliable tool for crafters who do a lot of hand-stitching.
This versatile tool allows you to swap out head attachments to perform multiple roles with a single handle. Typically, these sets include the grooving blade alongside edge beveler tips (heri-otoshi) and creasing or modeling tips.
Because it minimizes the number of individual tools you need to buy, it is very popular among beginners looking to keep startup costs low. However, because attachments rely on a small set screw, failing to tighten it firmly can cause your angle or spacing to slip during a cut. Whenever you use a multi-tool, you must always double-check that every component is locked down tight.
In leathercraft, there are other tools used to mark lines along leather edges. Here is how a stitching groover differs from the two tools beginners confuse it with most: wing dividers and silver marking pens.
Wing dividers use two pointed metal legs to scratch or press a faint crease line into the leather surface. They do not remove any leather material; they only compress it slightly under pressure.
A line made with wing dividers serves solely as a visual guideline for positioning your chisels. Because no material is removed, there is no channel for the thread to nest inside. When your goal is protecting stitches from abrasive wear, you must reach for a stitching groover rather than dividers.
Silver pens draw ink lines directly onto the leather grain. While the ink line is mostly pierced through when punching stitching holes, any remaining ink residue can compromise the aesthetic quality of your finished project.
A stitching groover uses no ink whatsoever; instead, it physically and dimensionally carves into the leather. In terms of providing both functional thread protection and structural elegance, it operates in a completely different category from simple drawing tools.
To draw out 100% of your stitching groover's potential, follow these correct operating procedures. Developing bad habits can ruin a project, so follow these steps carefully.
Decide on the distance from the leather edge to your stitch line based on your pattern. Generally, a margin of 3 mm to 4 mm yields the most balanced, attractive proportion.
Measure the distance between the guide fence and the cutter hole with a precise ruler. Once aligned, tighten the locking screw firmly using the appropriate wrench or screwdriver. Tightening by hand alone is not enough; the guide will inevitably slip mid-stroke. Never skip the step of securing it firmly with a tool.
Lay your leather flat on a non-slip, stable cutting surface (such as a rubber pounding mat or cutting board). Grip the groover and seat the guide fence flush against the edge of the leather.
Hold the body of the tool strictly perpendicular (at a 90-degree angle) to the leather surface. Tilting it forward or backward will cause the blade to dig too deeply or skip across the grain, making the groove uneven. Maintain an upright, vertical posture throughout the stroke.
Always carve your groove by pulling the tool smoothly from the far side toward yourself in one continuous motion. A stitching groover is never pushed forward—pulling is the absolute rule.
Applying too much downward force will cause the blade to catch, stretching or tearing the leather. Instead, apply gentle, even pressure—as if softly stroking the surface—and pull at a steady speed without pausing. When executed properly, a fine, curled ribbon of shaved leather will emerge effortlessly from the blade's hole.
When working on sharp right-angle corners, pull the tool right up to the intersection point and stop. Reposition the guide fence along the adjacent edge and groove toward the corner to let the lines intersect cleanly.
When grooving gentle curves, use a relaxed wrist to pivot the tool smoothly along the contour, ensuring the guide fence never loses contact with the leather edge. Slow down your stroke speed and visually confirm that the fence remains hugging the edge every millimeter of the turn.
Here are the four most frequent pitfalls crafters face when learning to use a stitching groover, along with foolproof solutions.
The most common accident occurs when the guide separates from the leather edge mid-stroke, sending the blade skidding into the middle of your piece. Once carved, that scratch cannot be erased.
This happens when you focus entirely on pulling the blade backward, forgetting to apply sideways pressure toward the edge. Keep a mental balance of 30% pulling force and 70% lateral pressure pressing inward against the edge. As long as the guide remains securely hugging the edge, slipping off track is virtually impossible.
A groove that is too shallow leaves the thread standing above the surface. Conversely, gouging too deeply compromises the structural integrity of the leather, making it susceptible to tearing along the seam.
The ideal channel depth is roughly half to equal the thickness of your chosen stitching thread. Never try to achieve full depth in a single aggressive pass. By making two or three light, controlled strokes along the exact same path, you can dial in the perfect depth effortlessly.
If the blade refuses to glide and instead pushes the leather into an unsightly, squished fold, the culprits are either a dull blade or insufficient anchoring of your piece.
Because stitching groover blades are miniature, even brand-new budget tools occasionally feature dull edges out of the box. Always test-carve on a piece of scrap leather first; if you feel resistance or catching, hone the cutting edge on a strop. Additionally, keep your non-dominant hand firmly pressing down on the leather right next to your path so the material cannot shift or buckle.
If you pull through the end of a line with full momentum, the cutter will fly off the edge, gouging a notch out of the corner.
Decelerate dramatically once you are within about one centimeter of the corner. For the final connection point, stop pulling horizontally; instead, gently press the cutter down from above to meet the crossing line. This is a subtle technique professionals use to keep corners crisp.
A stitching groover cannot be used universally across all types of leather. Its performance depends entirely on how the leather was tanned and its natural firmness. Using it on the wrong hide can ruin expensive material.
Vegetable-tanned leather—such as natural tooling leather (nume-gaw) and firm, oil-stuffed hides—is the ideal companion for a stitching groover.
Because vegetable-tanned leather features dense, tightly packed collagen fibers, the blade shears through cleanly, yielding continuous, thread-like shavings. The resulting channel boasts sharp, crisp walls, allowing the tool to perform at its best.
You should never use a stitching groover on chemically tanned chrome leathers, nor on floppy, supple leathers meant for garments or soft bags.
When a cutting blade meets soft leather, the loose fibers simply stretch and yield rather than shear cleanly. The cutter will snag and rip the grain, leaving a ragged mess. When marking stitch lines on soft, pliable leather, put the groover away and use wing dividers to gently crease a guide track instead.
For beginners preparing to invest in their first stitching groover, here are three essential criteria to ensure you pick a reliable tool.
Extremely cheap groovers found in generic overseas starter kits often suffer from poor blade geometry, with cutters that barely bite into leather at all.
For beginners especially, blade quality dictates your success. Opt for dedicated tools from established leathercraft manufacturers (such as Craft Sha or Kyoshin Elle in Japan). Though they cost around 1,500 to 3,000 yen, the difference in cutting precision and sheer enjoyment is immense.
A stitching groover blade is an expendable consumable part. Over extended periods of use, even the best edge will eventually dull.
Buying an entirely new tool every time is wasteful, so choose a model that sells standalone replacement blades. Sticking with standard, widely distributed models ensures you can refresh your cutting tip easily for years to come.
Selecting a handle shape and thickness that fits comfortably in your palm is crucial. A wooden handle with substantial girth allows you to pull steady lines without straining your hand or wobbling.
In contrast, ultra-thin, all-metal handles tend to slip in the fingers and induce fatigue during longer sessions. A solid, contoured wooden grip is almost always the best choice for stability.
With proper care, a miniature stitching groover blade will maintain its keen edge for years. Here are two straightforward maintenance routines every crafter can adopt immediately.
To touch up the edge, use green polishing compound (often called rouge or aobō in Japan) applied to a scrap of thick split leather (toko-gaw).
Apply a drop or two of sewing machine oil or light mineral oil to the flesh side of the leather scrap, then rub the green compound across the surface to build a leather strop. Place the flat underside of the groover blade flush against this stropping surface and pull backward several times. This simple motion clears away microscopic burrs, restoring that silky, effortless cut.
The tiny hole in a groover blade easily accumulates packed leather shavings and natural tallow. Once clogged, shavings can no longer evacuate, and the tool will immediately stop cutting.
After every crafting session, use the tip of a sturdy sewing needle or safety pin to gently push out any compacted leather dust trapped inside the hole. Finish with a light wipe of rust-preventative oil before storing the tool away.
A stitching groover is truly a game-changing tool capable of elevating leatherwork from amateur to professional grade.
Far beyond serving as a decorative line, it plays a vital functional role in sinking stitches beneath the surface to shield them from abrasion. Once you learn to set the correct width, hold the tool upright, and pull smoothly with balanced lateral pressure, anyone can achieve crisp, durable, and gorgeously uniform hand-stitching.
Evaluate the temper of your leather, invest in a quality tool, and try integrating clean grooves into your next project. Your handmade leather creations will transform into stunning, durable pieces that endure for years to come!
If you found this guide helpful, please feel free to share it with your fellow crafters on social media! Until next time, happy crafting—this was Yassy from Crafters!



For example, if you are looking for articles about mizuhiki, try searching for "mizuhiki"; if you are interested in tools, try keywords like "nippers" or "pliers."
