A Guide to Transfer Sheets for Crafting: Types, Materials, and Expert Application Tips
yassy
Crafters!

Hello, this is Yassy from Crafters! (・∀・)
I absolutely love everything about handmade crafts—making, looking at, and buying them! On my days off, you will always find me exploring craft shops or immersing myself in new projects. Whenever I discover cute charms, I can't help but collect them, and when I see beautiful creations by other artisans, my daily routine is to closely examine how they were made.
Because of my passion for crafting, I often get asked for advice by people who want to start making resin accessories. The plump transparency and sparkling charms embedded in resin pieces are truly enchanting just to look at.
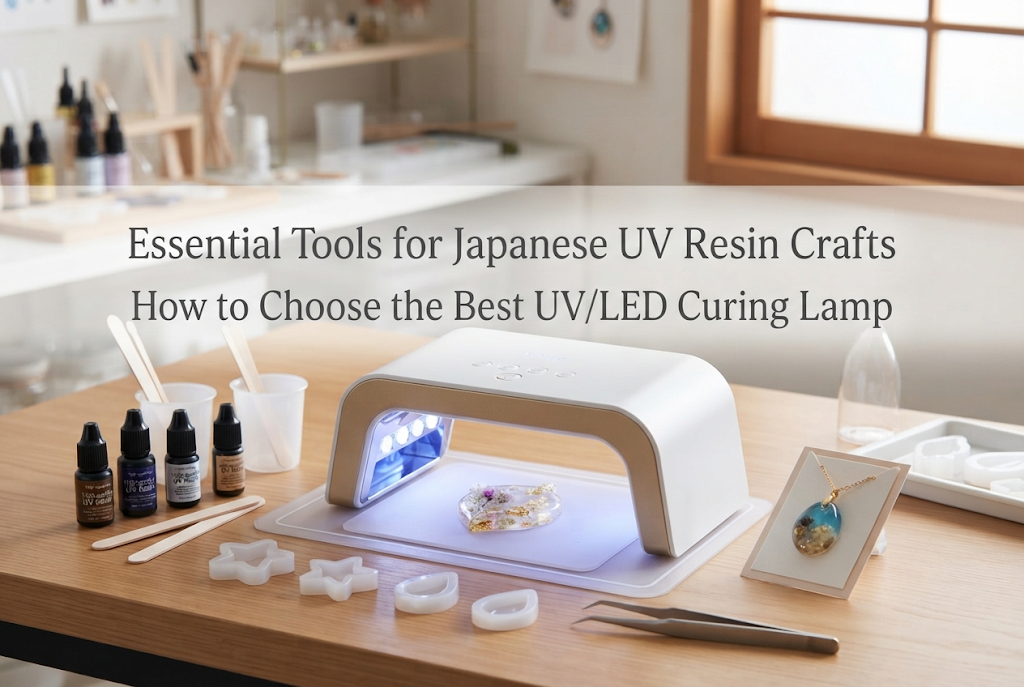
When starting resin crafting, one item that is absolutely essential is a curing light (lamp). Resin liquid undergoes a chemical reaction and hardens instantly when exposed to dedicated light rays. You might think, "Can't I just use sunlight and save buying a lamp for later?" But that is a major misconception!
Sunlight intensity varies greatly depending on the weather and time of day, and exposing your work outdoors lets dust and debris settle onto the surface. Most importantly, sunlight takes far too long to cure the resin, making your workflow frustratingly slow. To create beautiful, defect-free pieces exactly as you imagined, a dedicated curing lamp is a must-have from day one.
However, when you start looking for a light, you might hit a wall: "Which one should I pick?" or "I'm not sure which shape suits my crafting style."
Choosing the wrong lamp can lead to common pitfalls like your project not fitting inside, charms shifting out of place before curing, or buying something too bulky that ends up sitting in a closet. Conversely, selecting the right lamp allows you to create glossy, shop-quality accessories amazingly fast.
In this guide for beginners, I will draw on my experience to thoroughly explain everything you need to know—from project ideas and lamp types to workspace setup and recommended items available on Amazon. By the end of this article, you'll know exactly which curing lamp is right for you!
The main purpose of a lamp in resin craft is to cure liquid resin, transforming it into a solid, beautiful 3D object. First, let's understand the basic mechanism of how resin hardens under light and why a dedicated lamp is necessary.
Resin liquid contains an ingredient called a photoinitiator. When this compound receives ultraviolet (UV) light or visible light of a specific wavelength, it triggers a reaction that tightly bonds the liquid molecules together into a mesh structure. This process is called "curing."
If the wavelength of light doesn't match what the photoinitiator requires, no chemical reaction will occur no matter how long you shine the light, leaving the resin liquid. Therefore, it is essential to use a lamp that reliable emits the exact wavelength your resin requires.
Yassy's Note: It sounds technical, but simply put: UV resin will not harden properly unless you hit it with the right wavelength of light!
Because sunlight contains UV rays, resin placed by a window will eventually harden. However, relying on sunlight as your main crafting tool has severe drawbacks.
First, you cannot control the curing time. On a sunny afternoon, it might cure in a few minutes, but on cloudy days or in the evening, it can take hours. Second, the longer it takes to cure, the more likely dust and microscopic particles in the air will attach to the surface, ruining the transparency. Third, if you want to fine-tune the placement of tiny charms, outdoor or ambient window light might cause the resin to harden at unintended moments.
A dedicated curing lamp allows you to fully cure resin in just tens of seconds to a few minutes. This drastically increases your design freedom and ensures consistent, high-quality results.
Once you have a curing light ready, what kind of projects can you create? The greatest charm of resin craft is that your creative possibilities are limitless. Here are a few representative projects that are beginner-friendly, fun to make, and lovely to wear or use.
Pour resin liquid into silicone molds, arrange dried flowers, pressed flowers, shimmering glitter, or holograms, and cure them with your lamp. You can easily make delicate, gorgeous accessories perfect for adult fashion, featuring dainty motifs floating inside crystal-clear resin.
Using specialized ring molds, you can make refreshing clear rings or marble-patterned "nuance rings" by swirling together different resin colorants. Rings involve simple steps, making them ideal for mastering resin basics.
Create keychains using alphabet molds or metal bezel frames (known in Japan as mealu dish or open bezels). By creating blue color gradients with resin dyes and adding star sand and tiny seashells, you can easily recreate the popular Japanese "Umi-nuri" (ocean layer/painting) style that looks like a miniature piece of the sea.
Resin isn't just for jewelry! Covering the surface of a hair clip with dried flowers, or decorating the top of a plain pill case or phone ring socket with resin is immensely popular. Creating customized daily accessories packed with your favorite elements brightens your day whenever you use them.
When shopping online or at craft stores, selecting a lamp by its shape (type) is the easiest and most foolproof method. Consider your work environment and what you want to create to find the best fit.
A box- or dome-shaped lamp where you place your project entirely inside to cure.
Yassy's Note: Ideal for large projects and batch curing! A classic dome shape that prevents light leakage and cures thoroughly without uneven spots.
A slim, compact lamp with legs that fold flat like a small board.
Yassy's Note: Saves space on your desk! Highly portable with great storage convenience, perfect for taking to classes or crafting on the go.
A small, handheld torch light that lets you shine light on precise spots.
Yassy's Note: Powerful for tacking parts in place! A handy light lets you pinpoint and fix elements in just a few seconds.
A flat, plate-like light lined with numerous small LED chips.
Yassy's Note: Smart design that doesn't clutter your workspace! Very convenient for curing neat rows of flat accessories.
If you want to dive seriously into accessory crafting, the best combination is to get a Dome Type or Foldable Stand Type as your main light, paired with a small Handy Type for securing parts.
Price is always an important consideration when buying craft supplies. Resin curing lights range from budget-friendly options under 1,000 yen (approx. $7–10 USD) to professional models exceeding 10,000 yen.
If you buy a lamp with output that is too low, the resin may remain tacky on the surface or uncured inside. To ensure a beautiful finish, choose a light with an output of 24W or higher in the ¥1,500 to ¥3,500 range.
Once you've picked your lamp, set up a safe, comfortable workspace. Understanding how resin and UV lights interact is the first step to successful crafting.
Work away from windows or pull the curtains closed. Since resin reacts to UV rays in sunlight, working near a sunlit window can cause your resin to start hardening while you are still pouring it into molds or placing dried flowers. Once resin begins to cure prematurely, it cannot be smoothed back out!
Make sure your desk doesn't wobble and is completely horizontal. Even a slight tilt can cause resin liquid to pool unevenly in molds or bezels before or during curing, resulting in lopsided pieces. Also, manage your power cables so you don't trip over them.
Place a silicone craft mat under your lamp and across your work surface. If resin spills onto a silicone mat, you can simply cure it with your lamp and peel it off cleanly. It's an indispensable item to protect your furniture.
When resin cures, the chemical reaction generates a slight odor and mild vapors. To stay comfortable and safe, open at least two windows or keep an exhaust fan running continuously while crafting.
Here is a curated selection of reliable UV-LED lights offering a great balance of performance, quality, and ease of use.
A global bestseller loved by nail artists and resin crafters alike. This dome lamp packs plenty of power to cure resin rock-hard in seconds.
Developed by Padico, a premier Japanese craft manufacturer known for high-quality resin products.
A rechargeable, cordless pen light that offers ultimate portability.
A high-function dome light featuring a clear digital LCD display on top.
An original light produced by "Kakure Kobo GreenOcean," one of Japan's most popular online specialty shops for resin supplies.
Features a spacious interior and wide irradiation panel to cover large surface areas.
We've covered everything from basic UV/LED lamp mechanics and craft ideas to lamp types, setup tips, and top product recommendations.
Let's review the key points for choosing your ideal curing light:
Armed with this knowledge, picking your lamp will be a breeze. Find the perfect curing light to be your crafting partner, and start creating all the wonderful resin pieces you've dreamed of!
Until next time, happy crafting! This was Yassy from Crafters!



For example, if you are looking for articles about mizuhiki, try searching for "mizuhiki"; if you are interested in tools, try keywords like "nippers" or "pliers."
